1. About this guide
365 Rewind backs up the configuration of a Microsoft 365 tenant: policies, connectors, rules, filters, lists and tenant settings across the admin centers. Mail, files and chats are never read. It has two parts:
- The Windows app runs on a computer of yours. It signs in to Microsoft as you, reads the tenant, keeps snapshots, compares them and restores settings. Everything that can change your tenant happens here, and only when you confirm it.
- The portal, in your browser, holds your workspace: your team, your tenants, the history of every backup, and the backups you choose to keep there. It never signs in to your tenant.
This guide is for the IT administrator who looks after one or more tenants, in an organization of their own or for customers. It follows the order in which you will meet things: install and connect, back up, compare, restore, and then the parts you set up once: scheduled backups, the portal, your team.
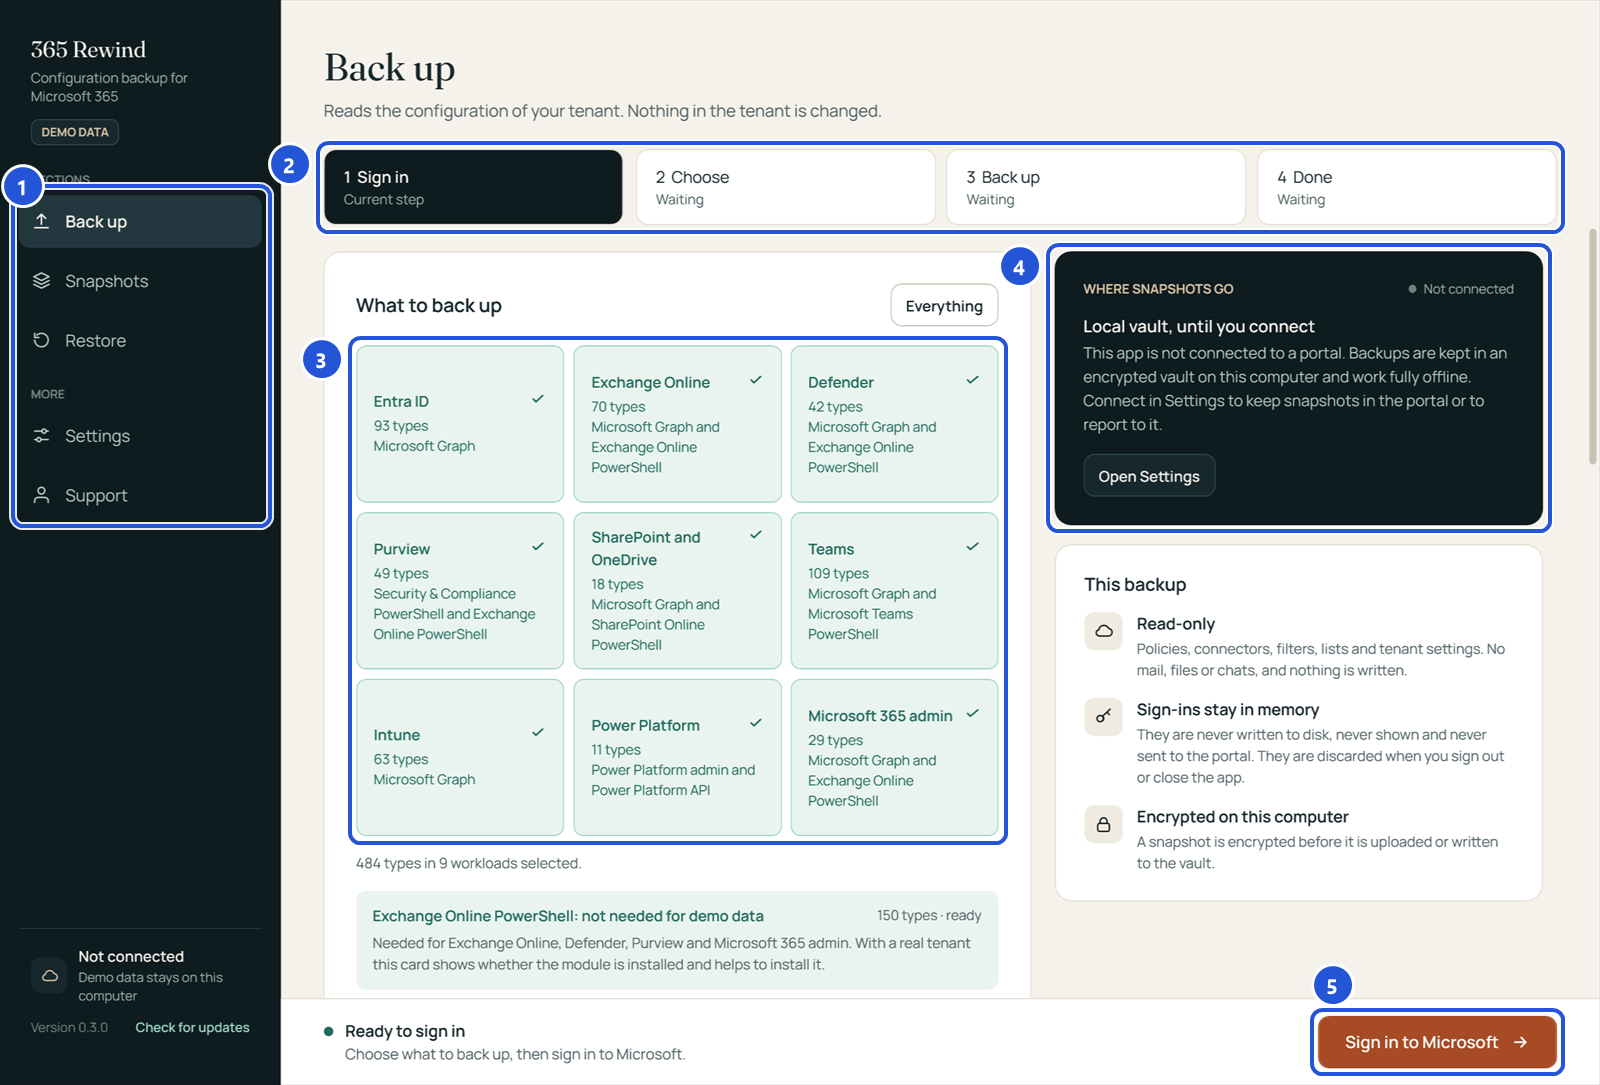
- 1The menu: Back up, Snapshots (browse and compare), Restore, Settings and Support. The foot of the menu shows the connection to the portal and Check for updates.
- 2Every task runs in numbered steps. The step you are in is dark; steps that are done show a check mark.
- 3The screen itself, here the workloads to back up.
- 4A summary card for the task, here where snapshots of this tenant are kept.
- 5The footer: what is happening now, and the button for the next step. Cancel appears here while something runs.
The app and this guide use the same words. A snapshot or backup is the saved configuration of one tenant at one moment. An item is one saved object, such as one Conditional Access policy. A type is a kind of item, such as Conditional Access policies.
2. Install the app and connect it to the portal
What you need
- A workspace in the portal. Start free creates one with your work email; colleagues are added later (see The portal).
- A Windows 10 or Windows 11 computer, 64-bit.
- An administrator account for the tenant. A backup asks for read permissions only; a restore asks separately for the write permissions of the items it puts back.
- For Exchange, Defender, Purview and Teams settings, Microsoft's PowerShell modules. The Back up screen shows a card for each module and helps you install a missing one.
Download and start the app
- Sign in to the portal. The Download the Windows app button is on the front page, the Tenants page, with the version and its SHA-256 checksum.
- Save
ConfigBackup-0.4.2.exeand start it. It is a single program; there is nothing else to install.
Connect the app to your workspace
Connecting is done once per computer. It lets the app keep backups in the portal, report backups, fetch restore plans and send Technical Support requests.
- In the app, open Settings. The card Portal connection shows the portal address; leave it as it is unless your organization uses another portal.
- Choose Connect.
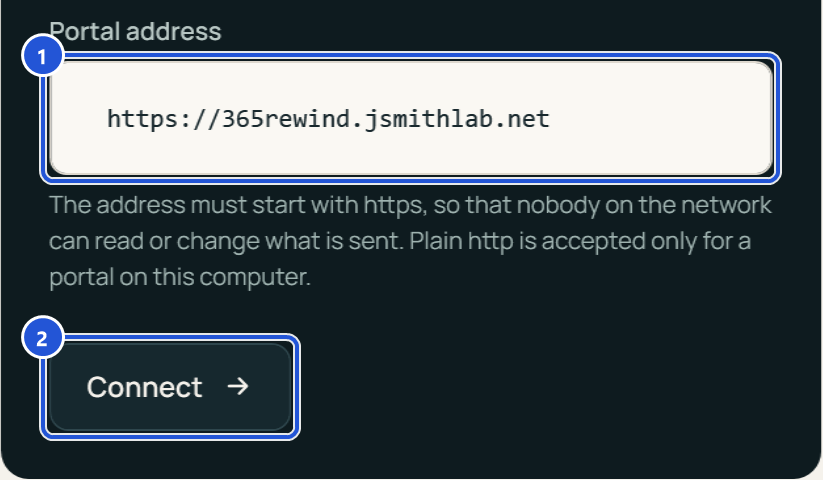
- 1The portal address. It must start with https.
- 2Connect asks the portal for a connection code.
The app shows an eight-character code, copies it to the clipboard and opens the portal's Connect an app page in your browser with the code filled in.
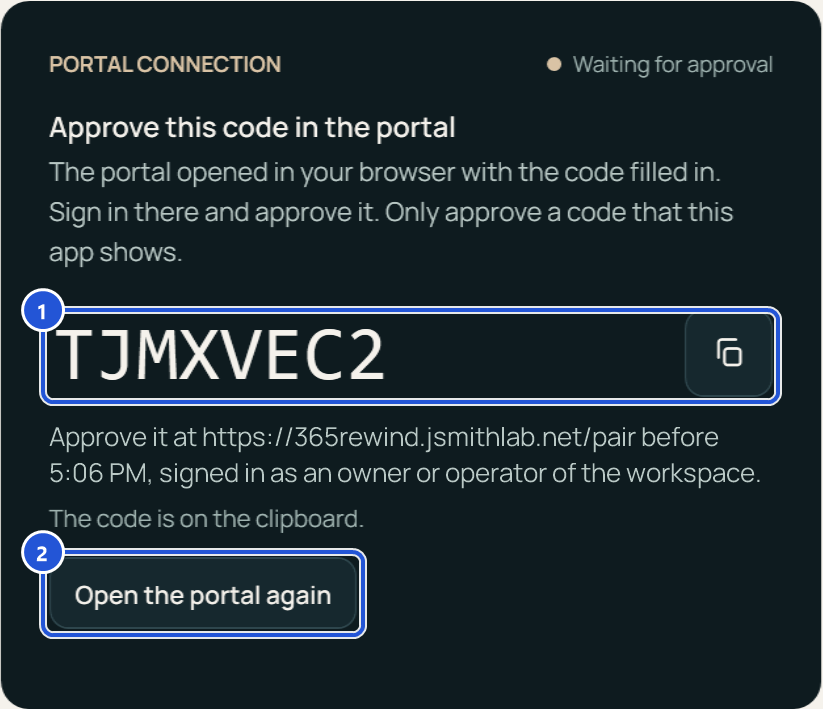
- 1The connection code, with a button that copies it again.
- 2Open the portal again if you closed the browser tab.
In the portal, sign in if asked. Only an owner or an operator of the workspace can approve.
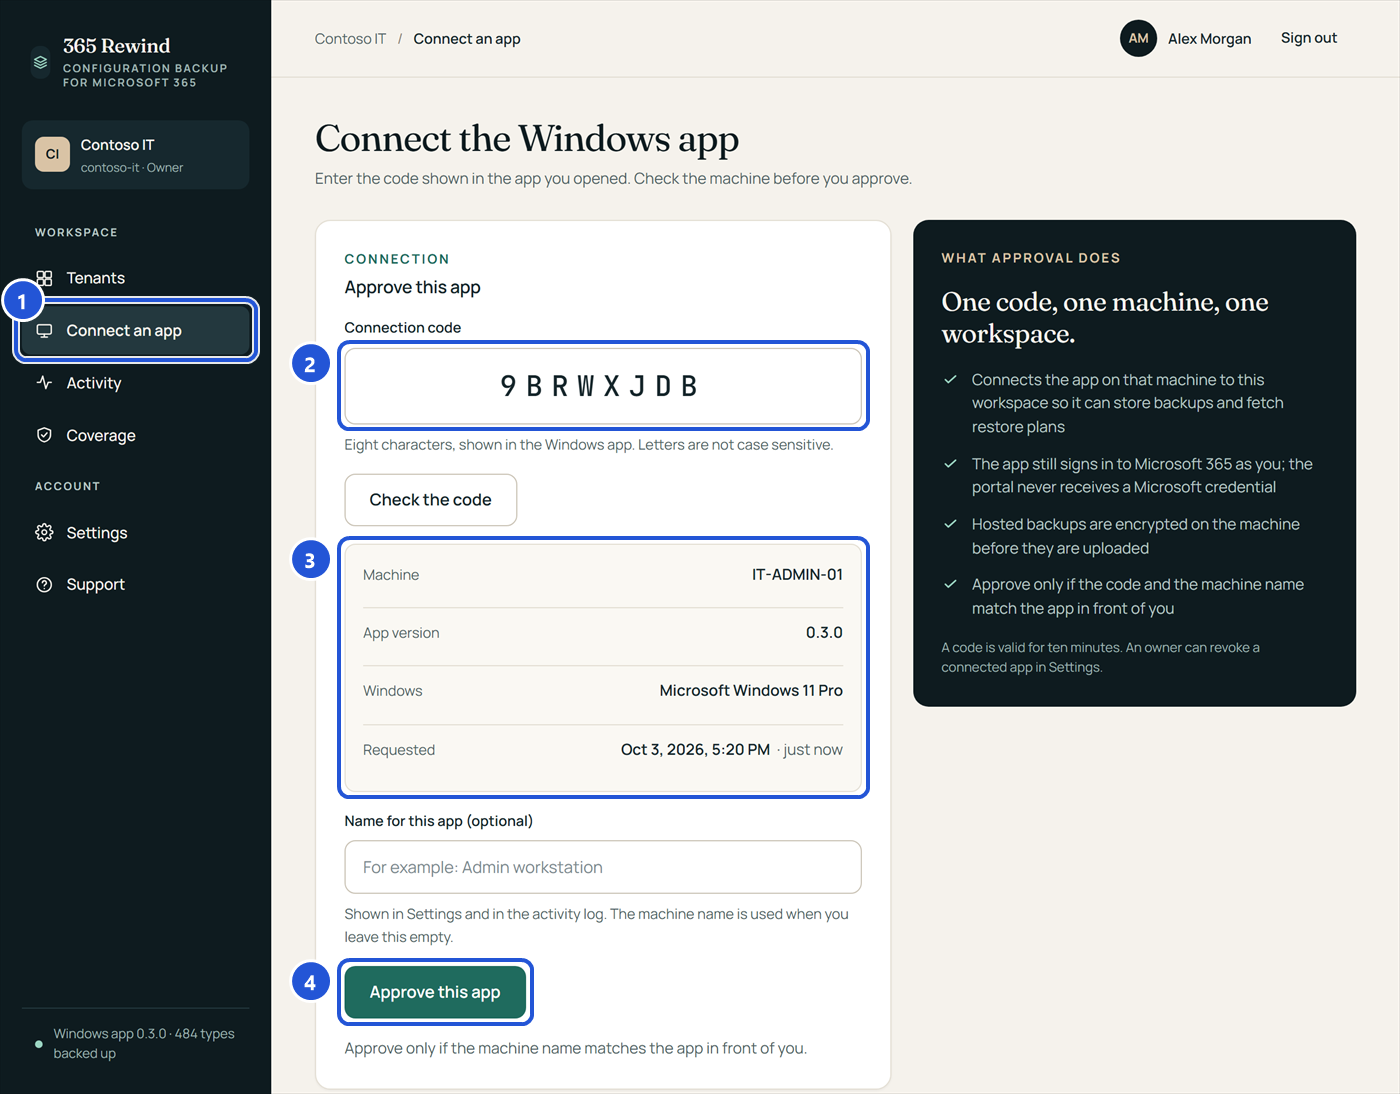
- 1Connect an app in the portal's menu opens this page at any time.
- 2The code from the app. Type it here if the page did not open with it.
- 3The computer that asked. Approve only when the machine name is the computer in front of you.
- 4Approve this app. You may first give the app a name, such as "Admin workstation"; it is shown in Settings and in the activity log. Approve waits until you tick the statement that your organization owns the tenants this app connects, or is authorized by their owner, and that you may connect them; it is recorded with your name and shown on the page of each tenant the app registers.
Within a few seconds the app shows Connected, with the workspace, the portal and who approved it.
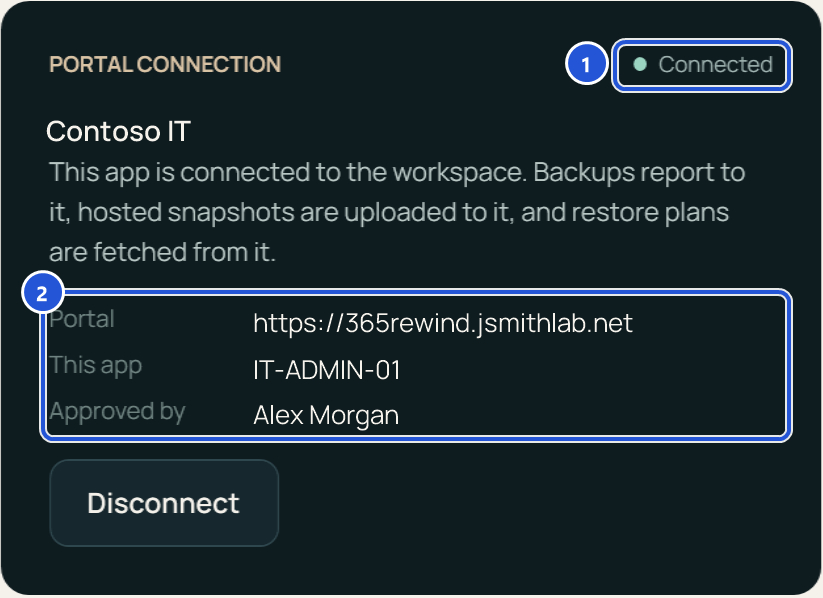
- 1The state of the connection. The foot of the app's menu shows it too.
- 2The portal, the name of this app in the portal, and the member who approved it. Disconnect ends the connection on this computer; an owner can also revoke the app in the portal's Settings.
The app is connected to one portal address, the one it was connected to, and refuses any other until you disconnect. If you connected it before version 0.4.2, it still uses the former address: choose Disconnect, then Connect. The address is now backup.glacierpointtech.com, and you approve the new code in the portal as before.
3. Your first backup
A backup reads the tenant and changes nothing in it. It takes a few minutes for a whole tenant.
1. Choose what to back up and sign in
- Open Back up. All workloads are checked; uncheck the ones you do not want, or choose Everything.
- Read Sign-ins this backup needs and Permissions the main sign-in asks for if you want to know, before you sign in, what is asked of your account. Fewer workloads ask for fewer permissions.
- Choose Sign in to Microsoft. Your browser opens Microsoft's sign-in page. Microsoft's page names "Microsoft Graph Command Line Tools", Microsoft's own tool through which the app signs in; that is expected.
2. Choose where the snapshots of this tenant are kept
After the sign-in the app shows the tenant and the account, and asks where its snapshots go. The choice is made once per tenant; an owner can change it later in the portal.
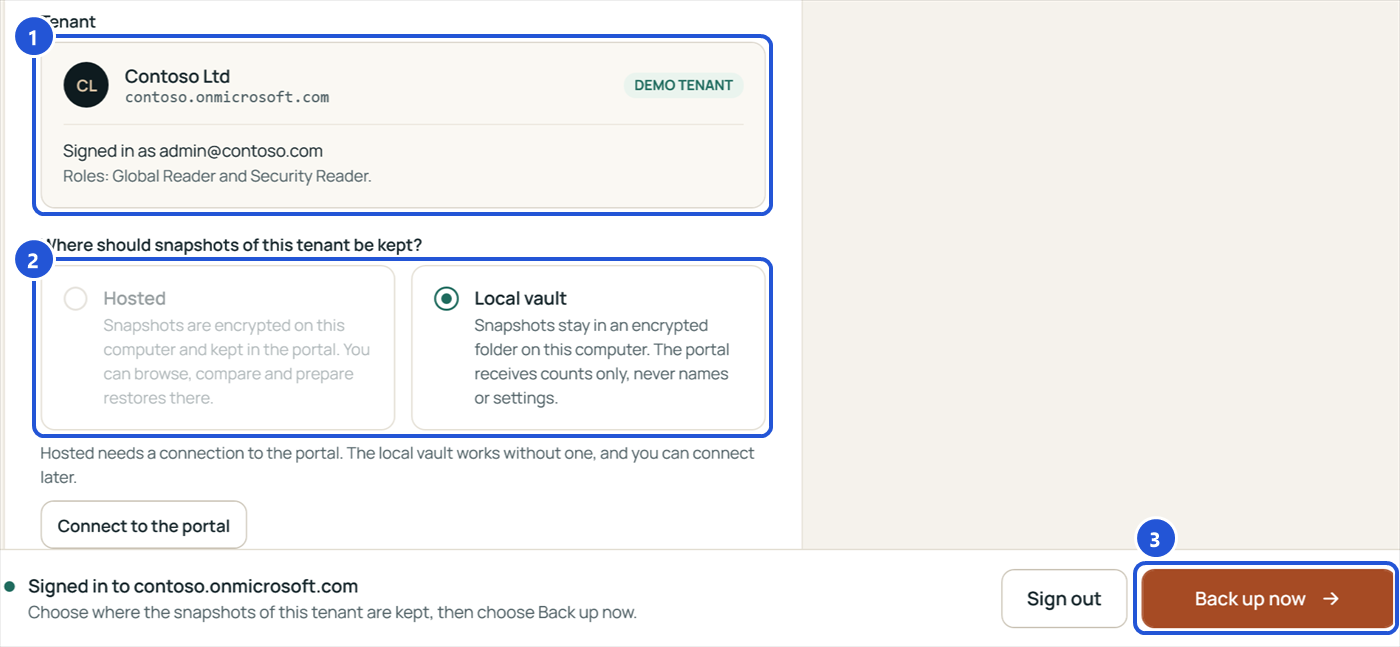
- 1The tenant and the account you signed in with, with its roles. Check that it is the tenant you meant.
- 2Hosted: each snapshot is encrypted on this computer and kept in the portal, where your team can browse it, compare it and prepare restores. Local vault: snapshots stay in an encrypted folder on this computer; the portal keeps codes and counts, with the names of the tenant, this computer and the app, never settings or the names of items. Hosted needs a connected app.
- 3Back up now starts the backup.
With the local vault, export the recovery key in Settings and keep it somewhere safe and separate. Whoever holds it can read the backups; without it, a lost computer means lost local backups.
3. The further sign-ins
Some admin centers are read through Microsoft's PowerShell modules, each with a sign-in of its own. Before the first of them, the app lists them all and what each one reads, then waits for you.
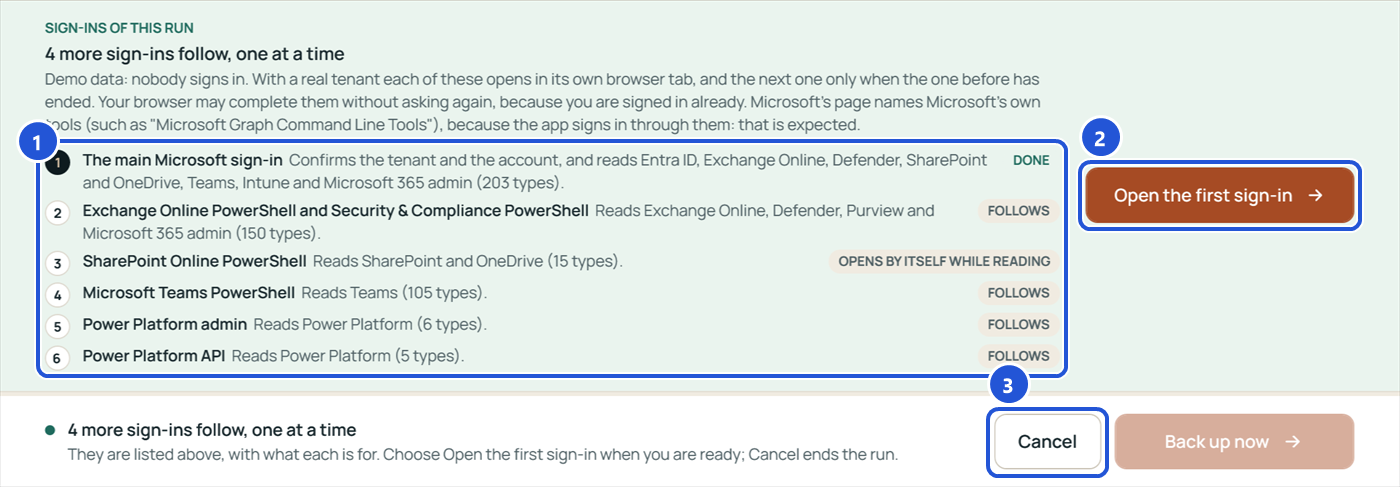
- 1Every sign-in of this run, what it reads, and its state: Done, Now, Follows, Skipped. SharePoint's module opens its own window while it reads.
- 2Open the first sign-in. Each one opens in its own browser tab; your browser may complete it without asking again.
- 3Cancel ends the whole run. While a sign-in waits, Skip this sign-in appears beside it: the backup goes on without it and records what it would have read as not read.
Six sign-ins are a lot for every backup. The Recommended setup in Settings, under Sign-in, creates an app registration that your organization owns, so that a backup needs one sign-in plus SharePoint's own window. You see every line of it before anything is written, and you can remove it completely. The app offers it after the first backup that needed several sign-ins.
4. The result
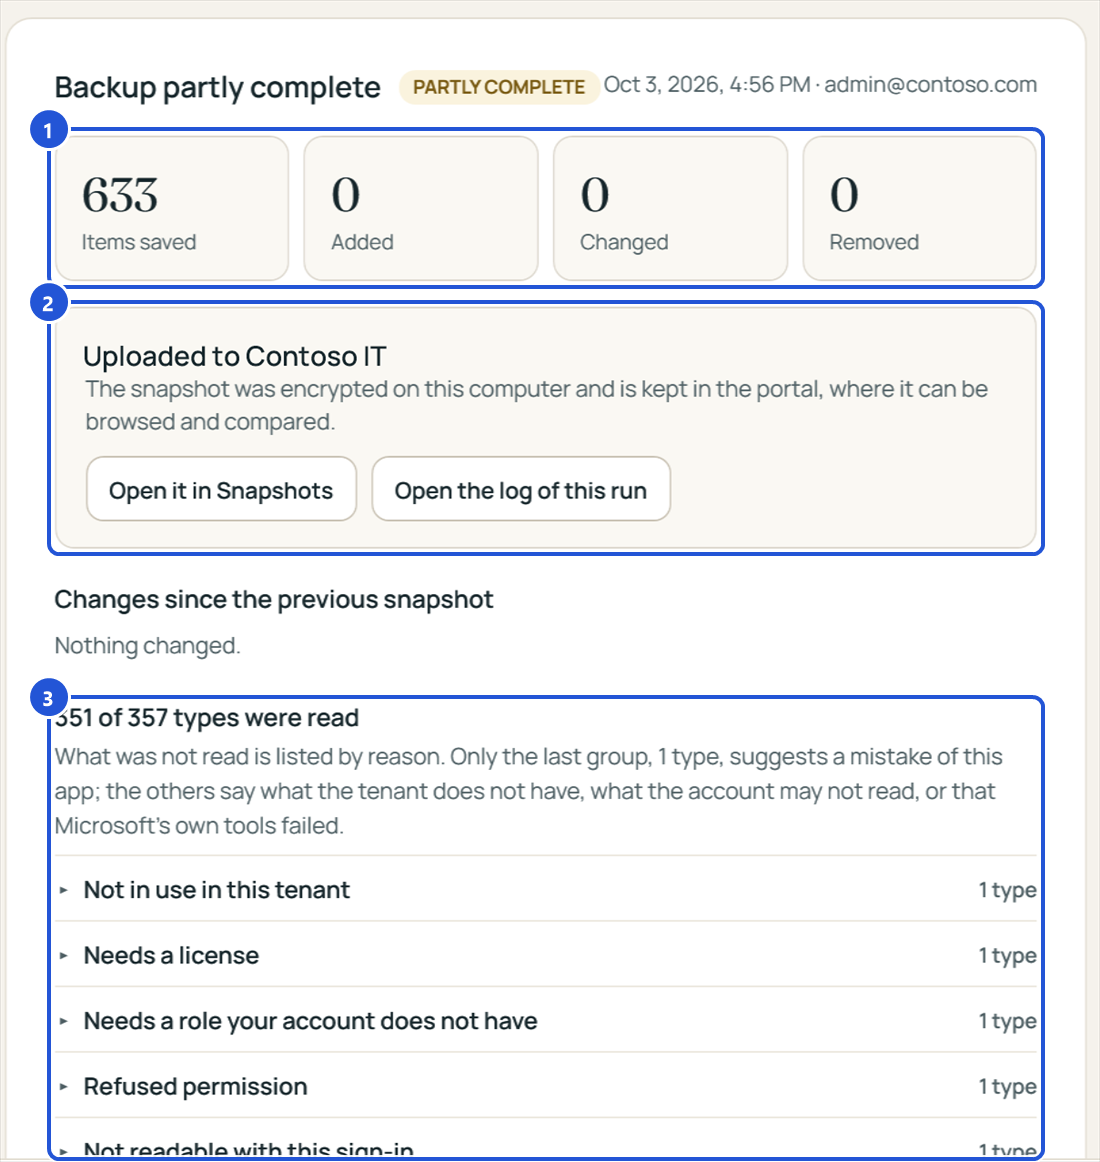
- 1Items saved, and what was added, changed and removed since the previous snapshot of this tenant.
- 2Where the snapshot went. Open it in Snapshots shows it at once; Open the log of this run shows what happened, step by step.
- 3What was not read, grouped by reason: not in use in this tenant, needs a license, needs a role your account does not have, refused permission, not readable with this sign-in, Microsoft's tools failed, could not be read. Open a group to see the types and what to do. Only the last group suggests a problem with the app; please send it to Technical Support.
A backup that could not read everything is marked Partly complete. It is still a good backup of everything it lists.
4. Reading the comparison
Open Snapshots. Choose a tenant at the top right; its backups are listed newest first, from the vault on this computer and from the portal together.
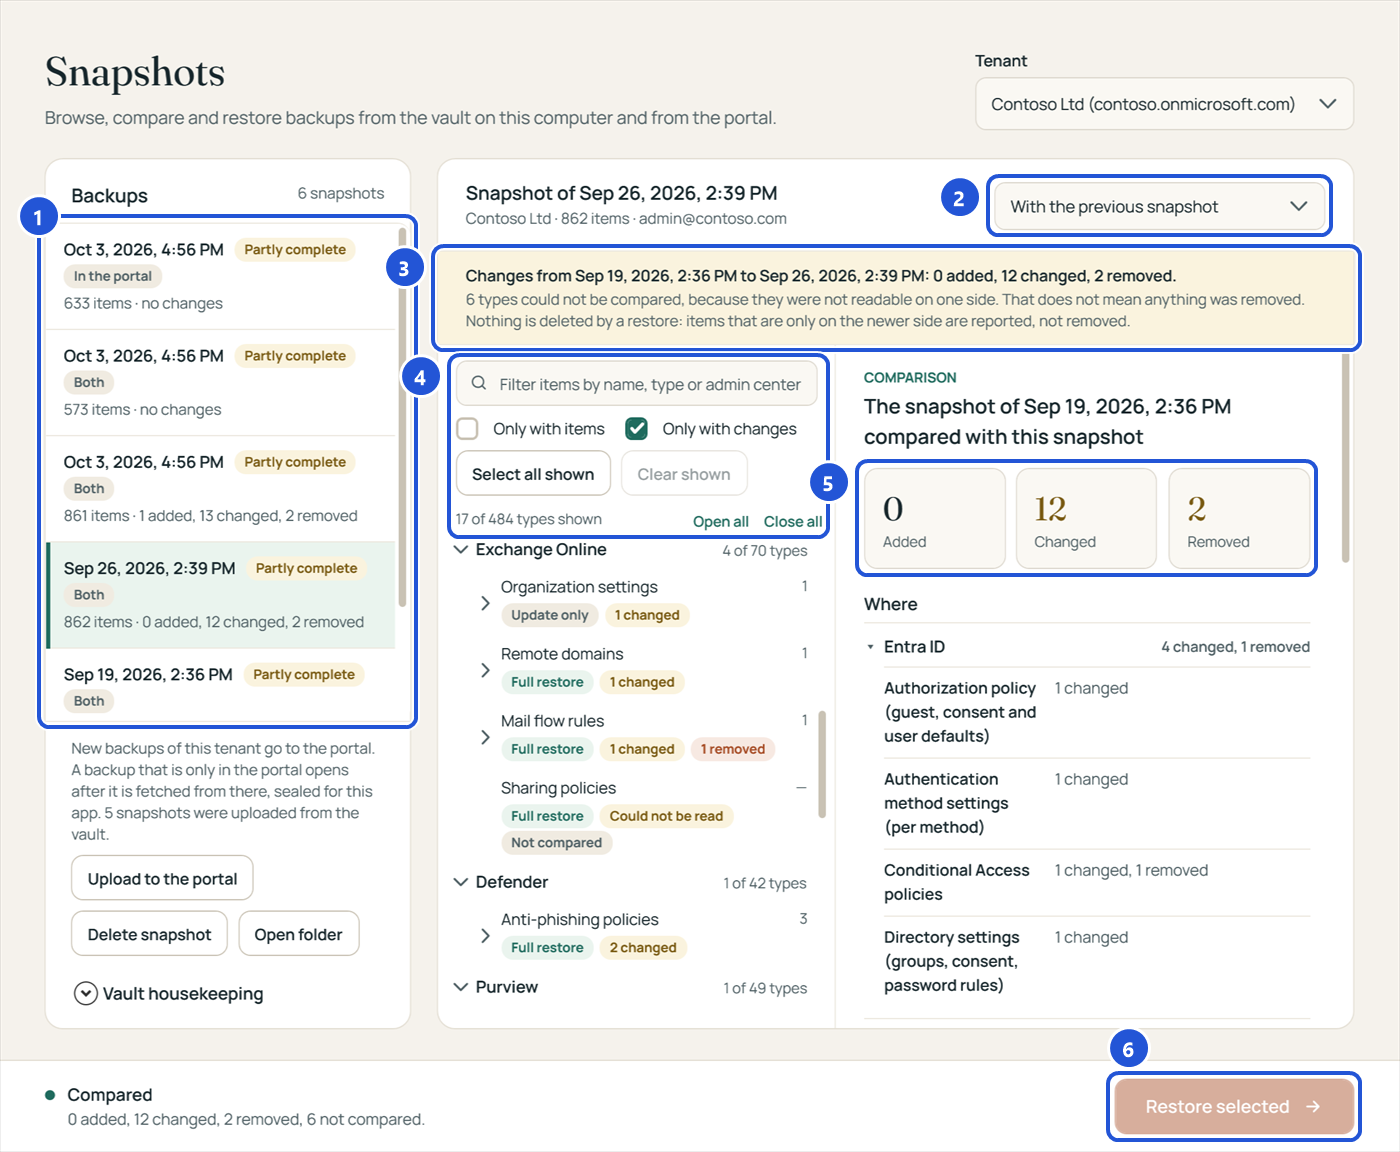
- 1The backups of the tenant. Each says where it is kept: In the vault, In the portal or Both. A backup that is only in the portal is fetched when you open it. Upload to the portal copies vault snapshots of a hosted tenant there.
- 2Compare with: the previous snapshot, any other snapshot, or the tenant as it is now.
- 3The summary: added, changed and removed between the two, and how many types could not be compared because they were not readable on one side. Not compared never means removed.
- 4The filter box finds items by name, type or admin center (Ctrl+F). Only with changes hides what is the same; Select all shown checks every item the filter shows, for a restore.
- 5The counts, and where the changes are, per workload and type.
- 6Restore selected starts a restore of the checked items (see Restoring settings).
Every type in the tree carries badges. Full restore and Update only say what the app can put back: a full restore recreates a missing item, an update only changes one that exists. Restored by hand means you put it back in the admin center with the app's help (see Restoring by hand). The change badges say what happened between the two sides.
One item, setting by setting
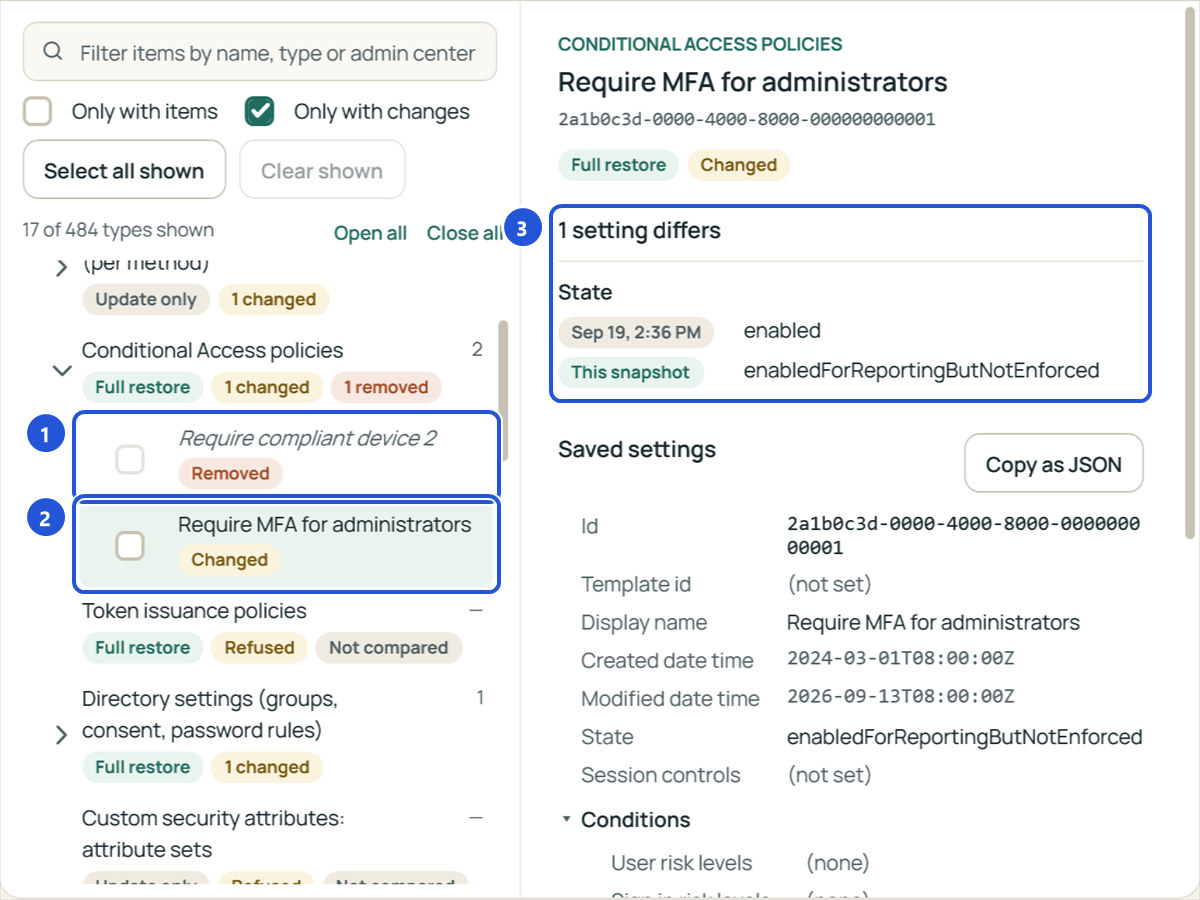
- 1An item that is in the older snapshot only, marked Removed.
- 2An item whose settings differ, marked Changed. Choose it to see the details.
- 3The settings that differ, the older value above the newer one. Below them are all the saved settings of the item, and Copy as JSON.
Noise such as modification times and counters is left out, so a change is a real change.
Compared with the tenant as it is now
To see what changed in the tenant since a backup, choose With the tenant as it is now. The app reads the types in view (the selected type, the selected workload, or everything) with your sign-in.
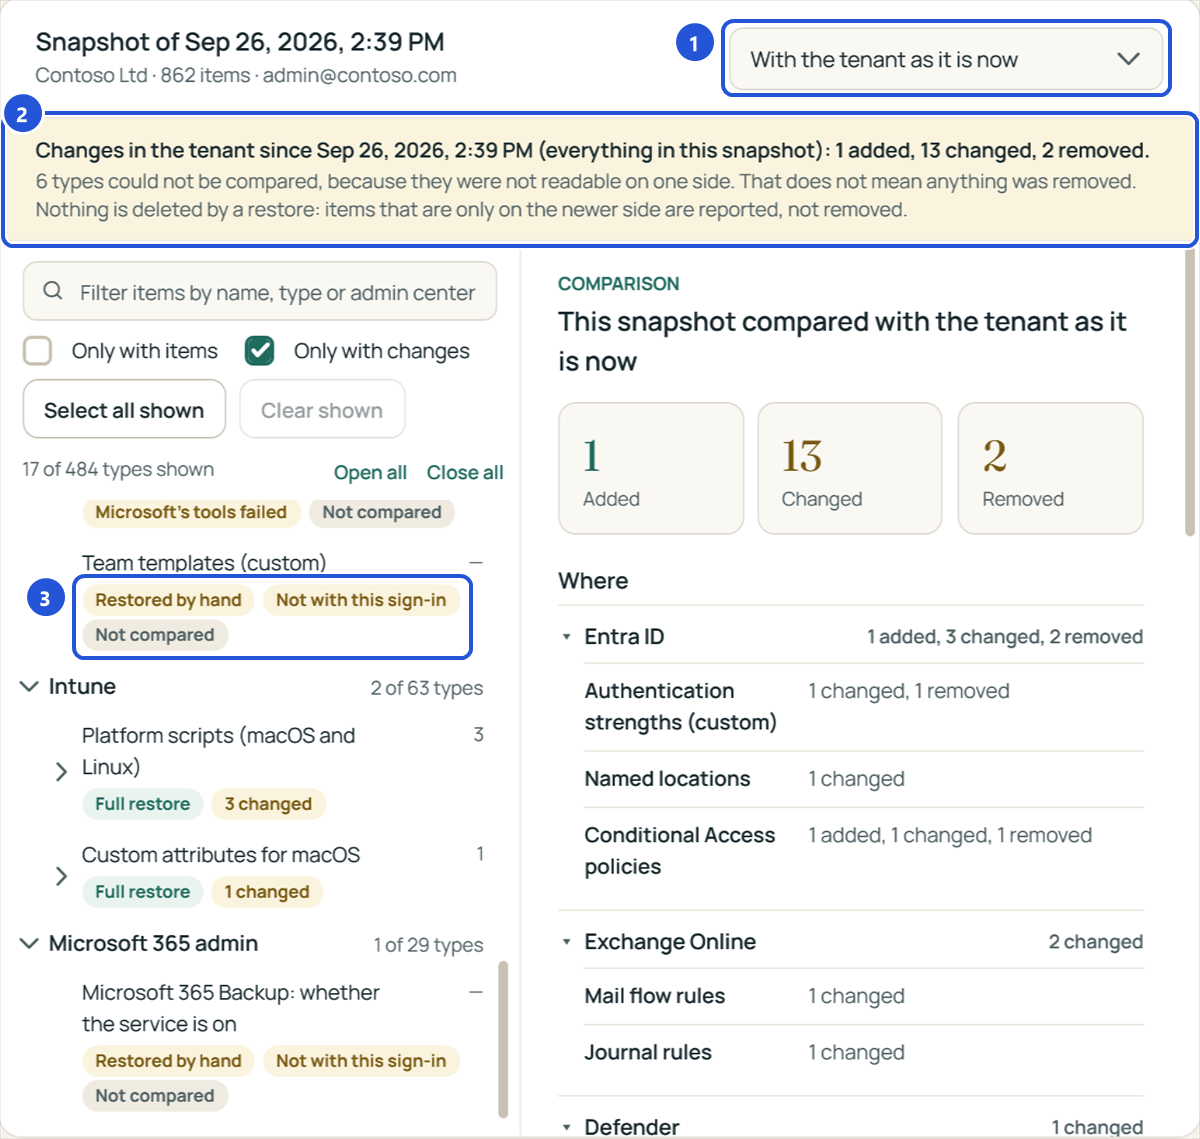
- 1The comparison chosen.
- 2What changed in the tenant since this snapshot.
- 3Types the app cannot read with this sign-in are marked as such and not compared.
5. Restoring settings
A restore puts saved settings back into the tenant. It runs in five steps (Review, Sign in, Preview, Apply, Result), and nothing is written before you have seen the preview and confirmed it. A restore never deletes anything: items that exist in the tenant but not in the snapshot are left alone.
1. Choose what to restore
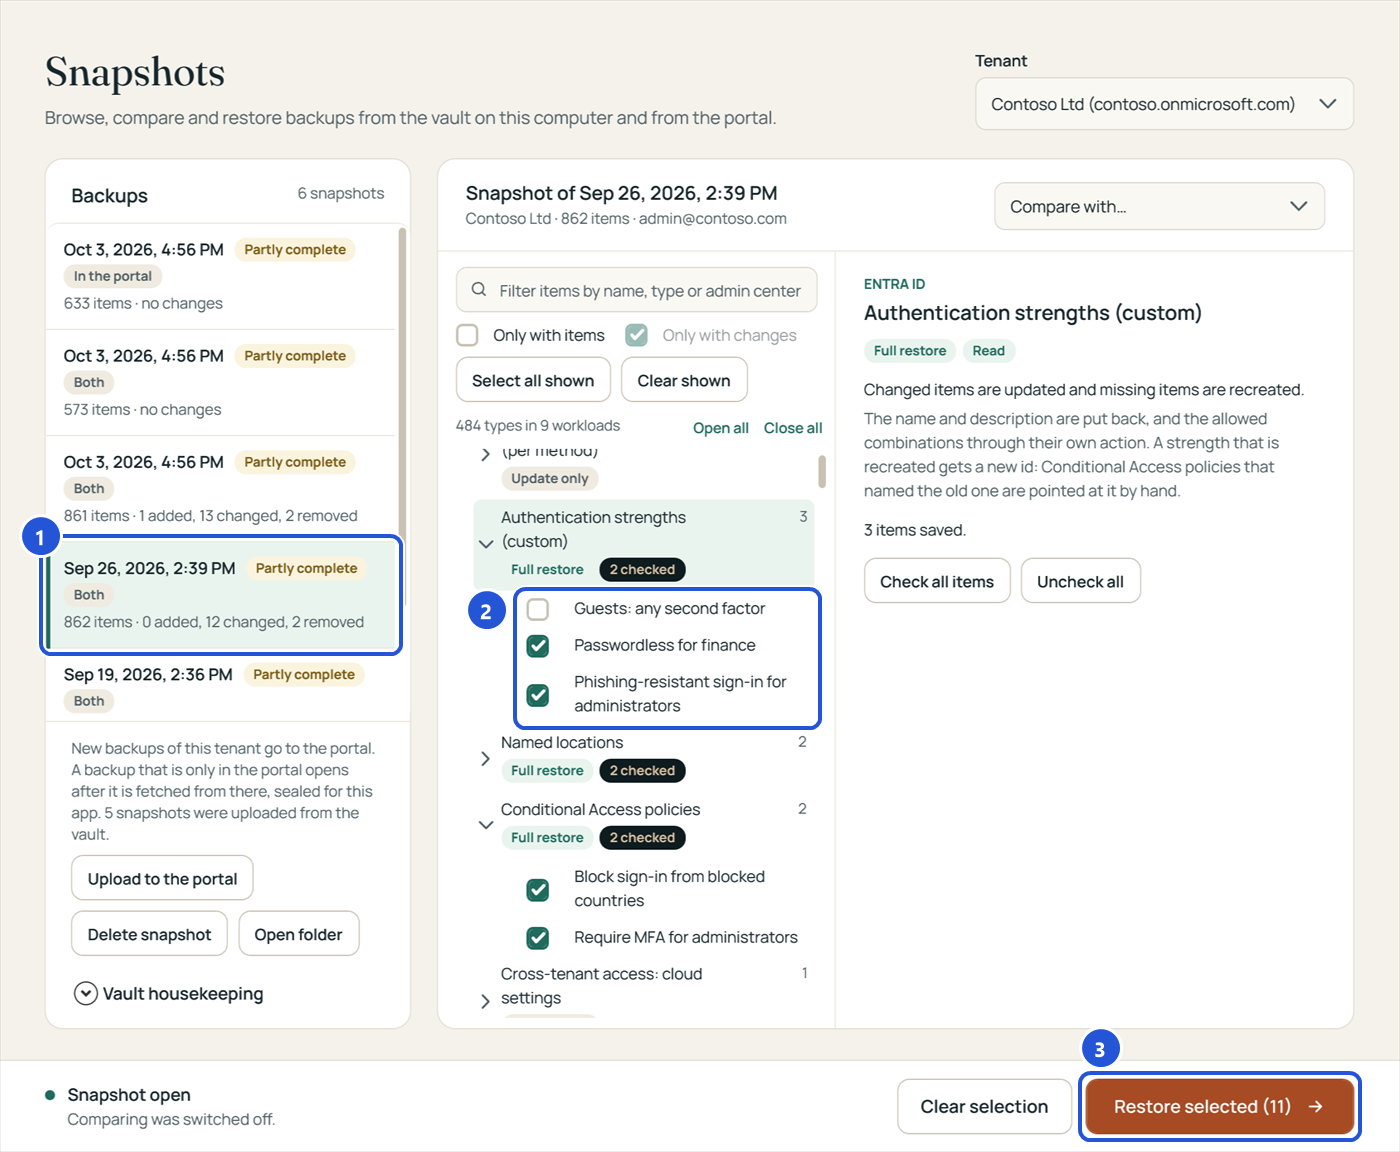
- 1The snapshot to restore from.
- 2Check items one by one, or a whole type with Check all items. A type shows how many of its items are checked. At most 200 items go into one restore.
- 3Restore selected, with the number of checked items.
A restore can also come from the portal: a member prepares a restore plan from a hosted backup, and the app runs it (see Restore plans).
2. Review the plan
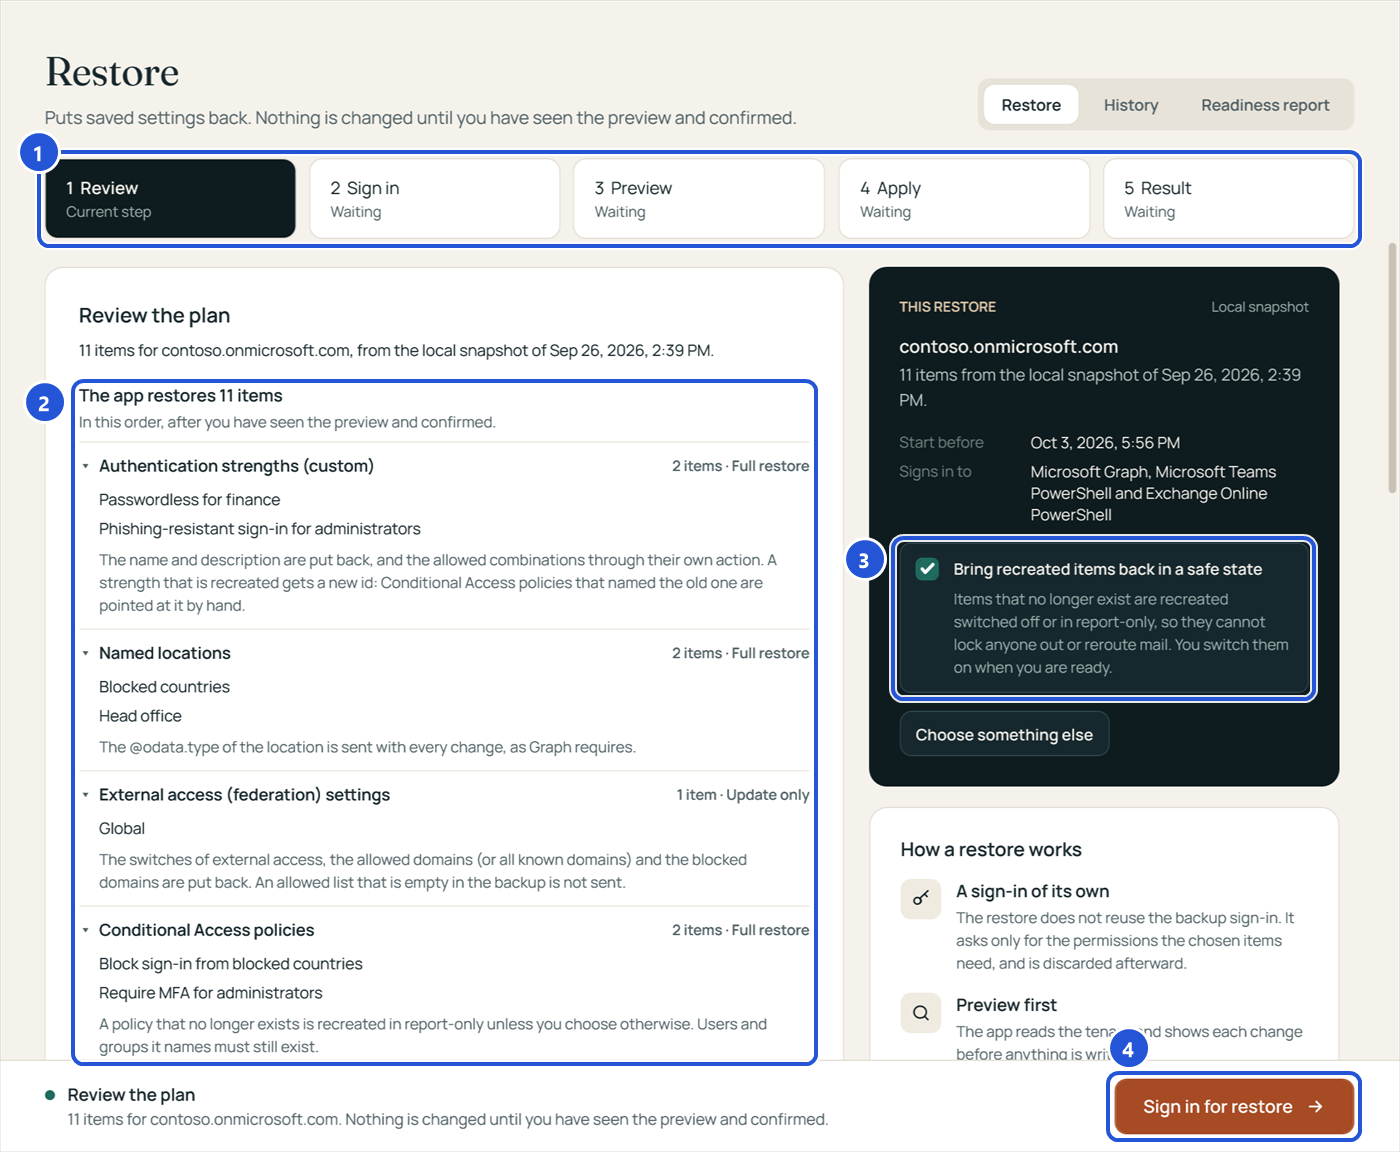
- 1The five steps of a restore. When some items are restored by hand, a step By hand comes before the result.
- 2What the app restores, in the order it will run, with what is put back for each type. Items you restore by hand are listed separately.
- 3Bring recreated items back in a safe state (on by default): an item that no longer exists is recreated switched off or in report-only mode, so it cannot lock anyone out or reroute mail. You switch it on when you are ready. Items that still exist are updated in place, and those changes take effect at once.
- 4Sign in for restore.
Further down, the Review step lists the permissions the restore sign-in asks for, a choice for what happens when an item fails (by default the app goes on and skips only what depends on the failed item), and Save a restore script (see Restoring by hand).
3. Sign in for the restore
A restore does not reuse the backup sign-in. It signs in on its own, asks only for the write permissions of the chosen items, and the sign-in is discarded as soon as the restore has run.
4. The preview
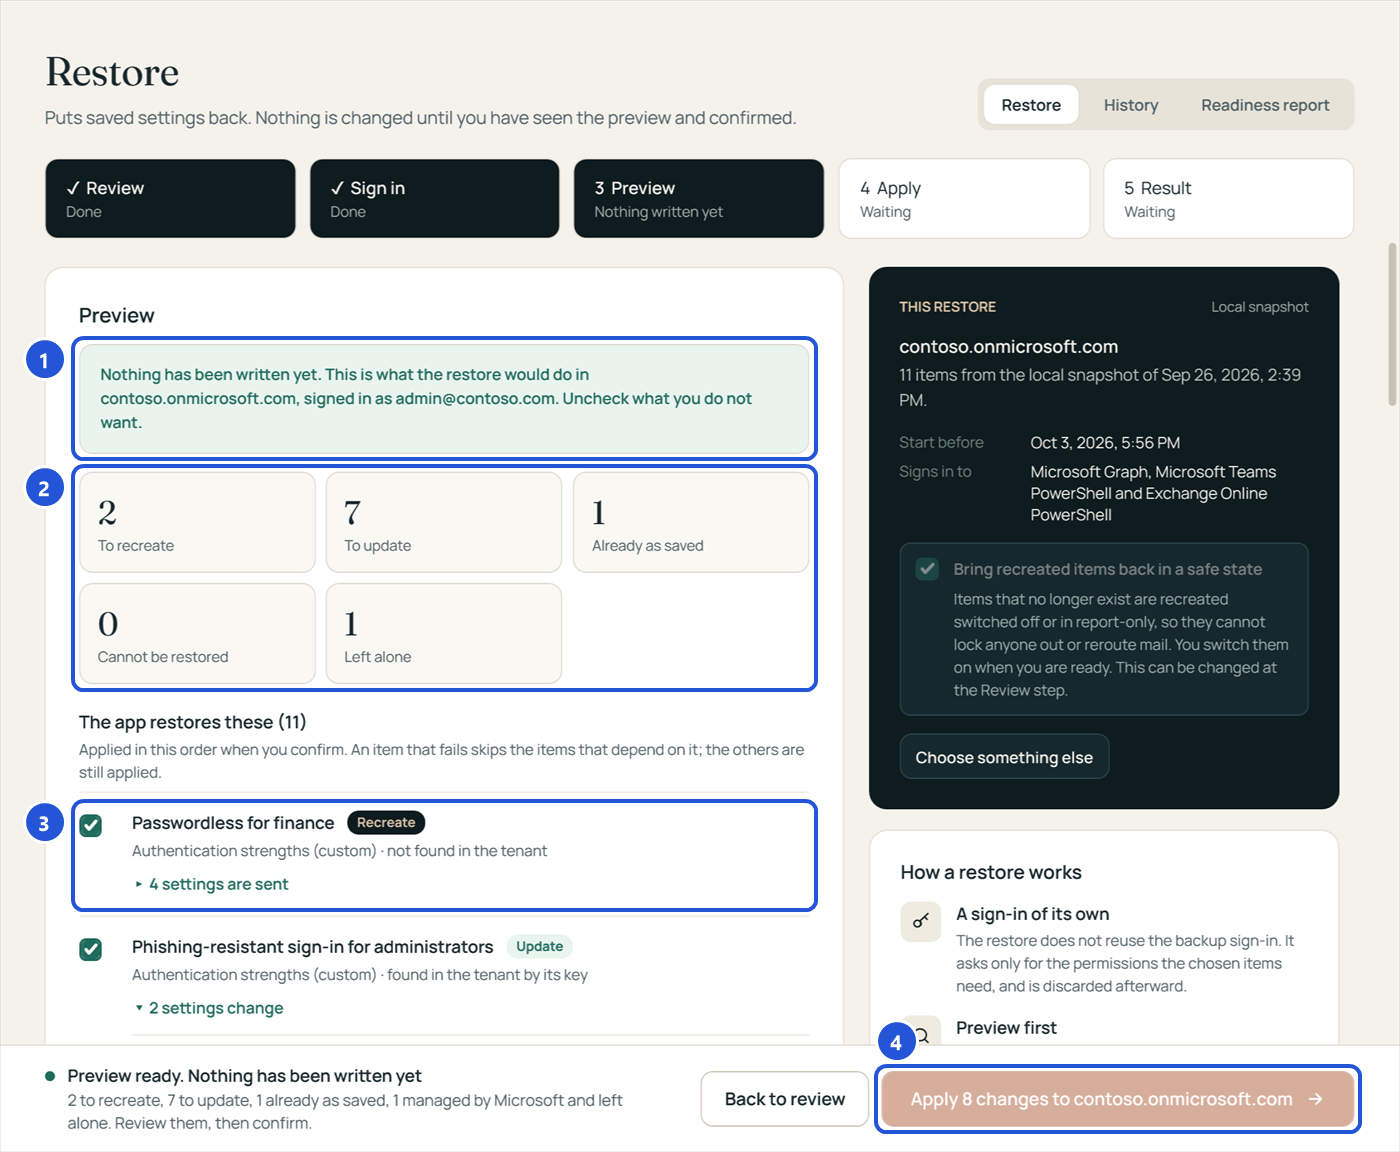
- 1The tenant and the account the restore would write with.
- 2What the restore would do: recreate, update, nothing (already as saved), cannot be restored, and left alone (for example an object Microsoft manages).
- 3Each item with its action. Uncheck any item you do not want; open settings change to see the value in the tenant now beside the value after the restore.
- 4The apply button stays off until you confirm.
5. Confirm and apply
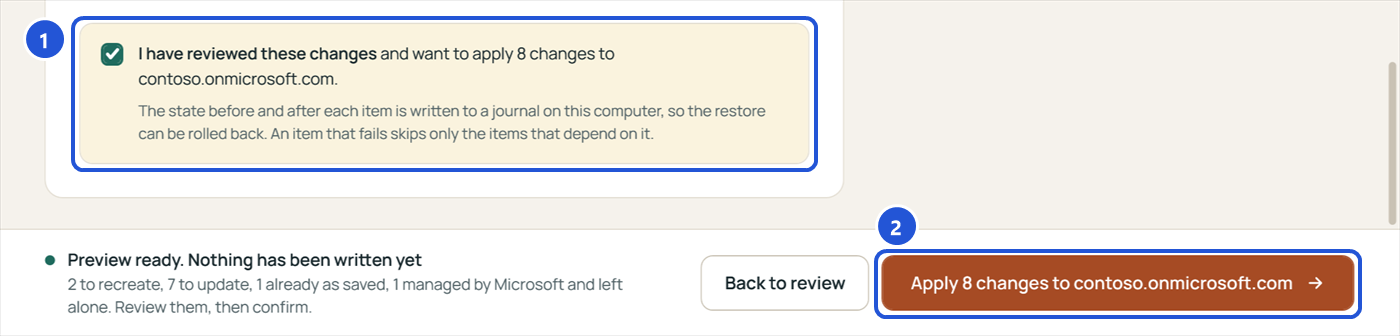
- 1Check I have reviewed these changes. The state before and after each item is written to a journal on this computer.
- 2Apply, with the number of changes and the tenant.
6. The result
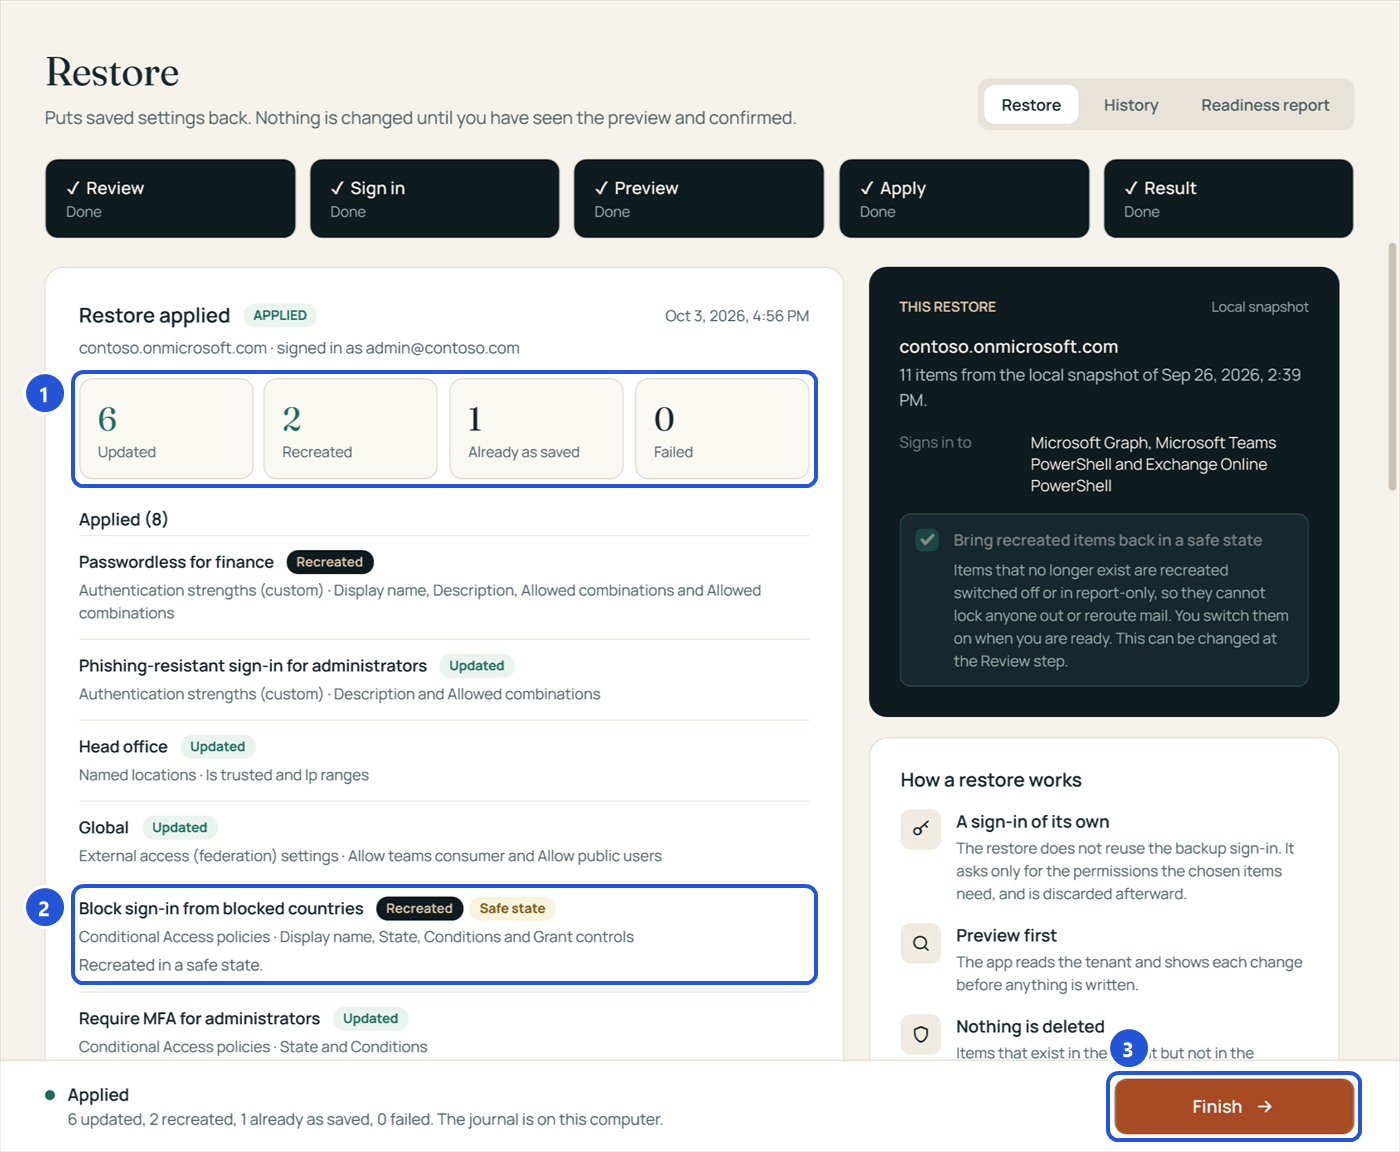
- 1What was updated, recreated, already as saved, and what failed.
- 2Each item with the settings that were put back. Safe state marks an item recreated switched off or in report-only mode: check it, then switch it on in the admin center.
- 3Finish closes the restore. The result stays available under History.
An item that fails is listed with the reason in plain words; the items that depend on it are skipped and named. The others are still applied. When the app is connected, it reports the counts of the restore to the portal (never the settings).
6. The journal and rollback
Every restore keeps a journal on this computer: the state of each item before and after. If the result is not what you wanted, the app offers a rollback for every change it made: it writes back the values in the journal and removes again what the restore recreated. It needs the journal on this computer; Microsoft can refuse an item, and the result lists any that could not be rolled back. Steps you carried out by hand are not undone by the app. Choose Roll back this restore on the result, or Roll back in History. A rollback signs in again.
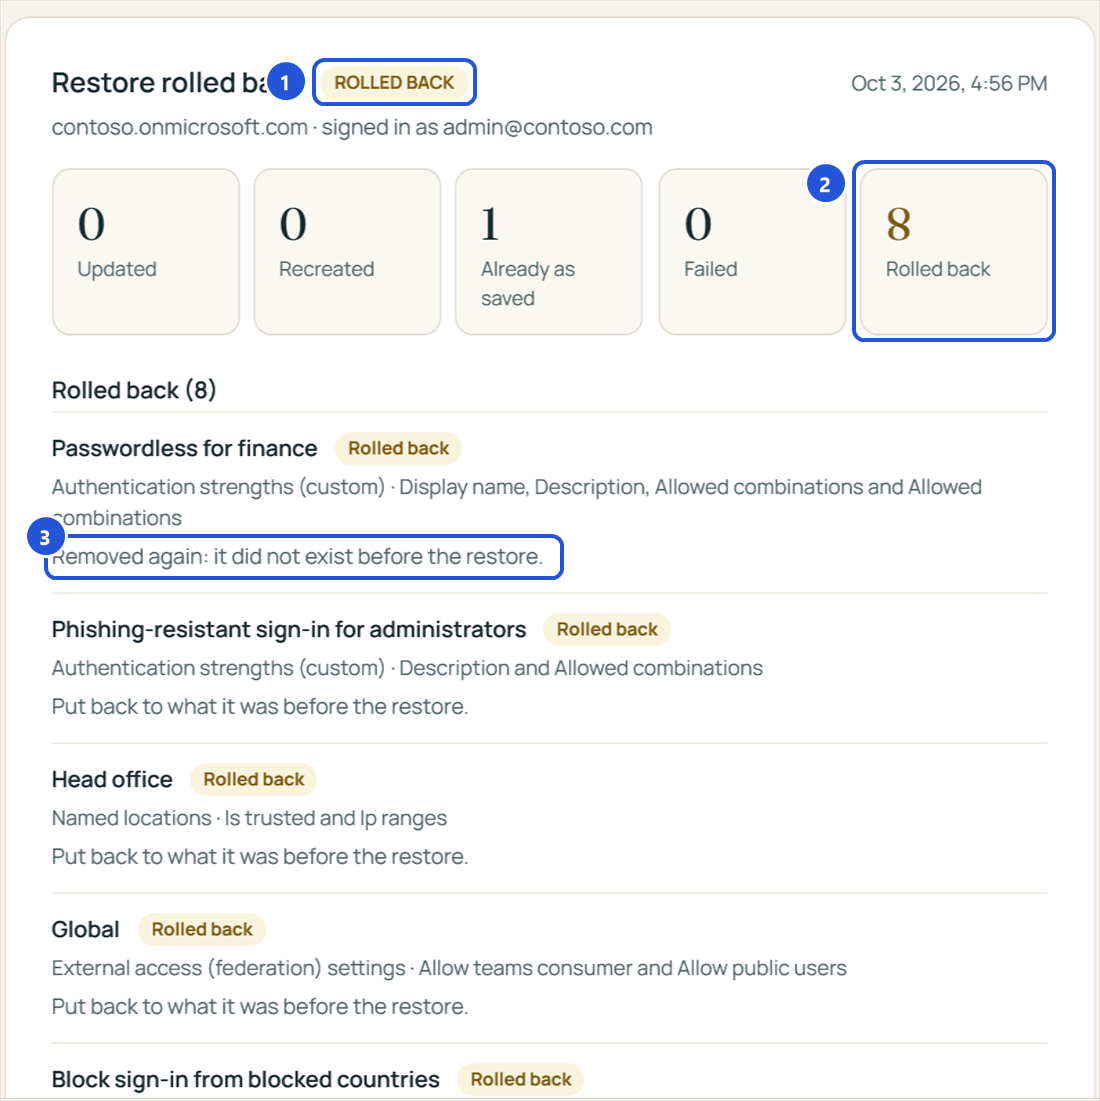
- 1The restore is marked Rolled back.
- 2How many items were put back.
- 3An item the restore had recreated is removed again; an item it had updated gets its earlier settings back.
History
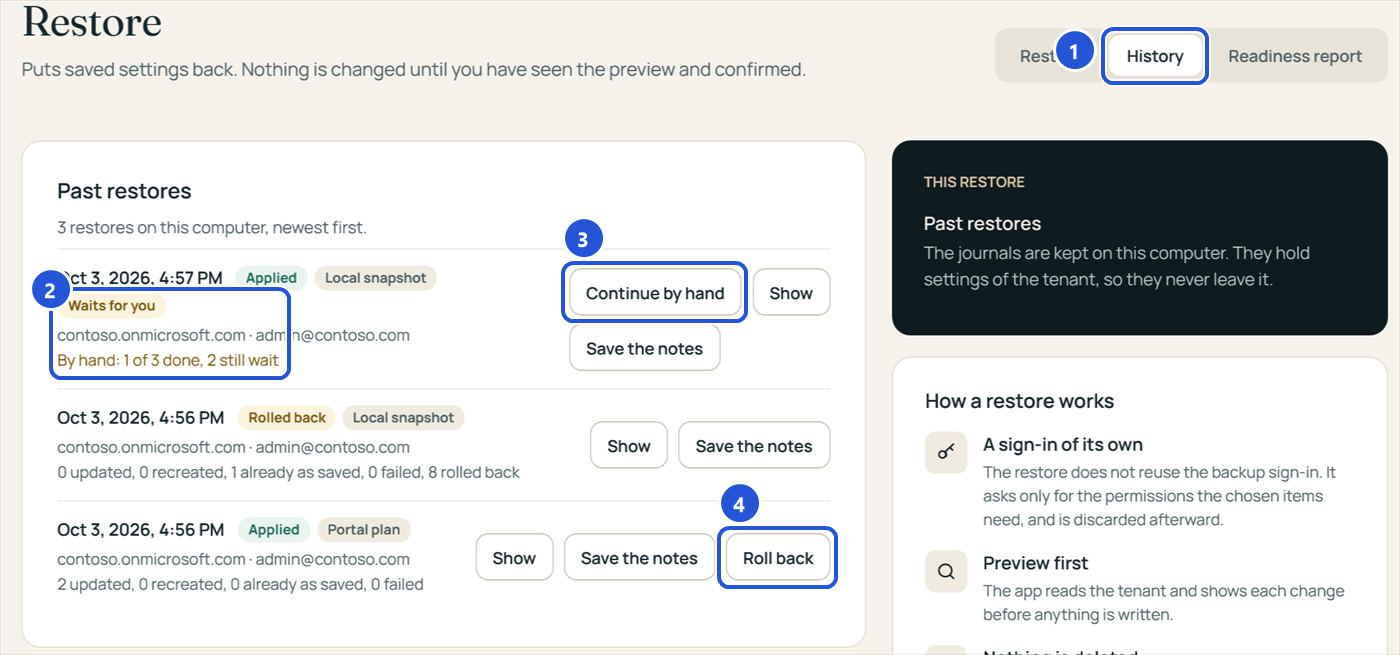
- 1History, beside Restore at the top of the screen.
- 2A restore with items that still wait to be put back by hand.
- 3Continue by hand opens its walk-through again.
- 4Roll back a restore from its journal. Save the notes saves a readable copy of how to undo each change by hand.
The next backup is the best check that the tenant holds what was restored.
7. Restoring by hand: the walk-through
Some settings can only be set by a person in the admin center, or are better decided by one, such as federation settings, where a wrong value locks users out. The app restores these with you: it shows the saved value, the value in the tenant now, and where to set it. These items carry the badge Restored by hand; you check them like any other item.
After the preview (and after Apply when the plan also has items the app writes), the restore continues with the step By hand, one item at a time.
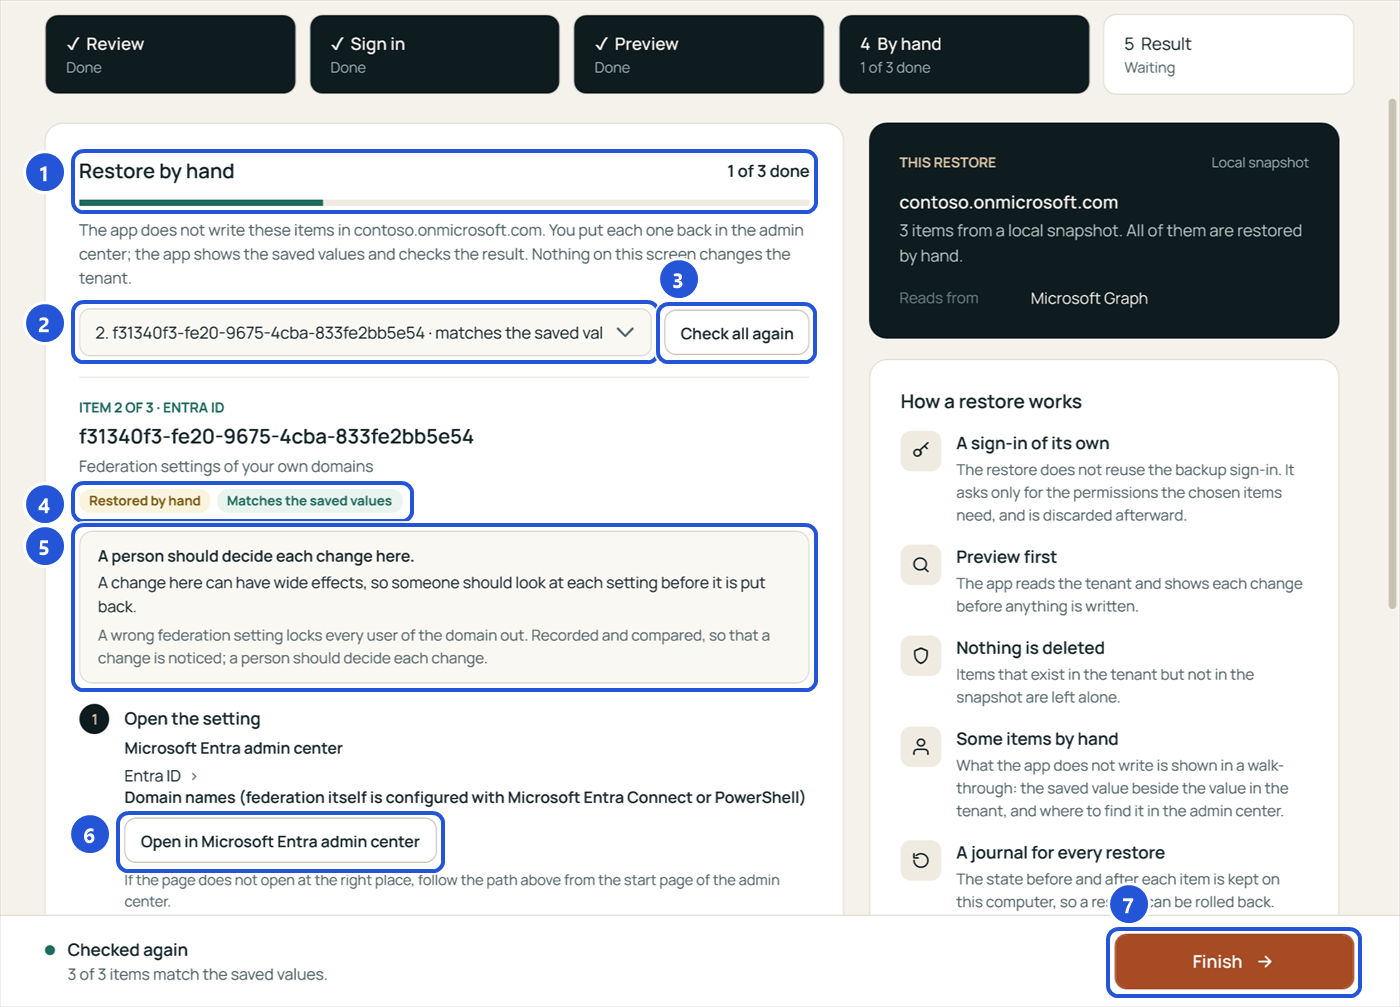
- 1How many items are done.
- 2The list of items, to jump to any one of them; Previous and Next are further down.
- 3Check all again reads the tenant and compares every item with the saved values.
- 4The state of this item: Differs, Not in the tenant, or Matches the saved values.
- 5Why this item is restored by hand.
- 6The admin center and the path to the setting. Open in opens that page in your browser.
- 7Finish when you are done. Items that still wait can be continued later from History.
Below the path, the app lists the settings that differ, the saved value beside the value in the tenant now, each with a Copy button. Show all settings lists every saved setting. Make the change in the admin center, choose Check again to confirm the item now matches, and Mark as done. Nothing on this screen changes the tenant.
The restore script
Prefer to run the restore yourself, or need it reviewed first? Save a restore script, at the Review step or on the result, writes a PowerShell script with the items of the plan.
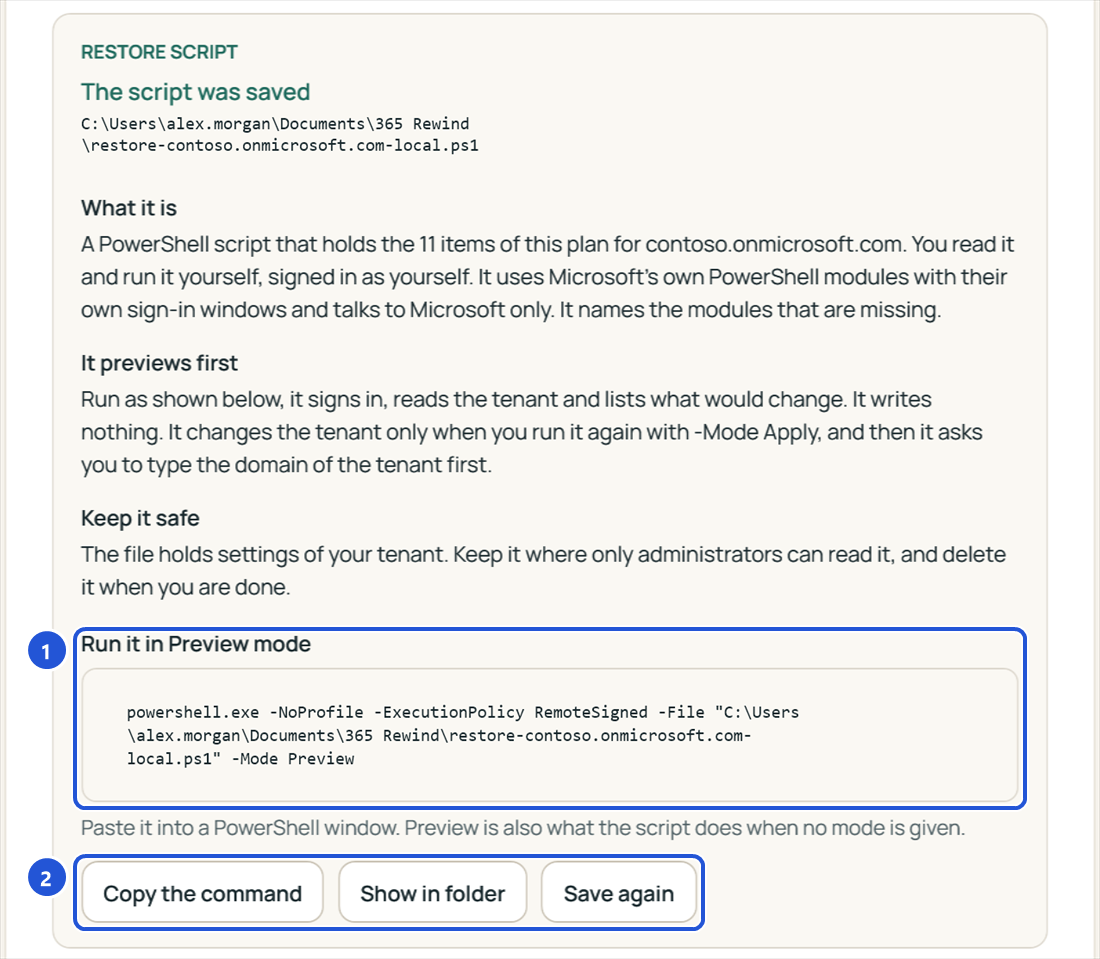
- 1The command that runs the script in Preview mode: it signs in with Microsoft's own modules, reads the tenant and lists what would change. It writes nothing.
- 2Copy the command, Show in folder, or Save again.
Run it again with -Mode Apply to make the changes; it asks you to type the domain of the tenant first, and it carries its own undo. Your settings travel in the script as data, never as commands. The file holds settings of your tenant: keep it where only administrators can read it, and delete it when you are done.
8. Scheduled backups
Scheduled backups run on a computer of yours, without a person, as a Windows task. They sign in through a second app registration in your organization, "365 Rewind (unattended)", with a certificate of that computer instead of a password. A restore is never scheduled: it always needs a person. Scheduled backups are part of the Essentials (weekly), Professional and MSP (daily) plans.
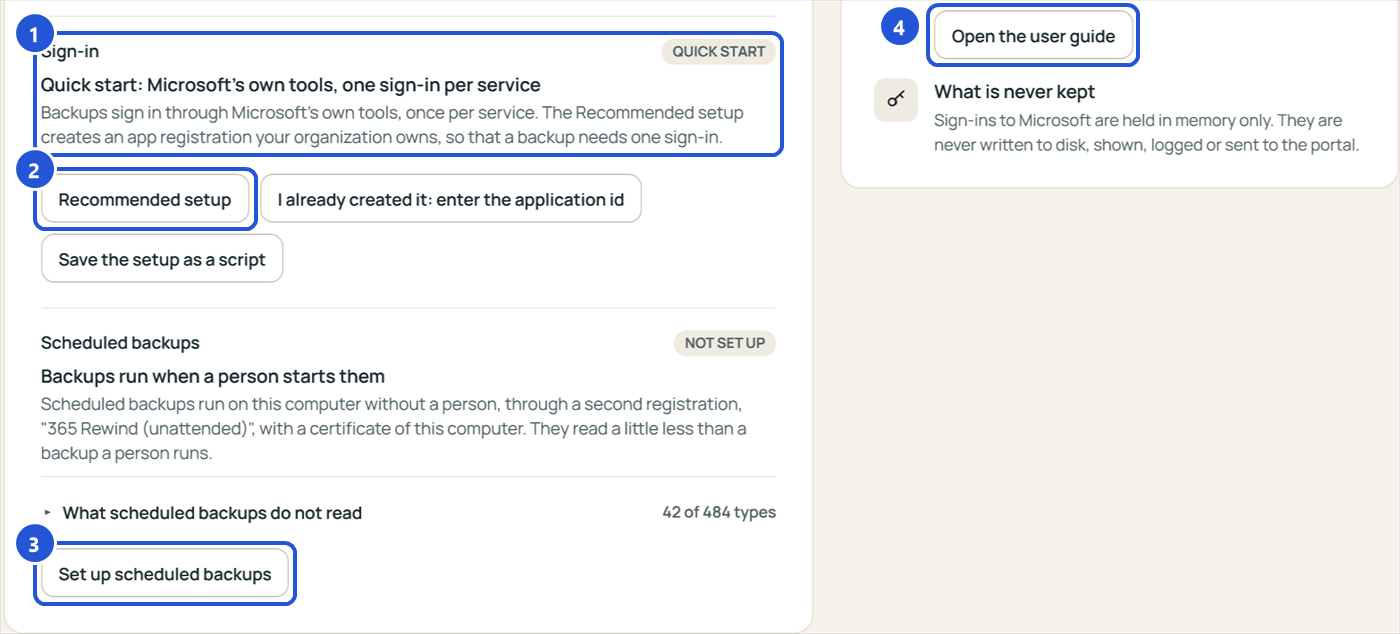
- 1How backups of this tenant sign in. Quick start uses Microsoft's own tools, one sign-in per service.
- 2Recommended setup: one sign-in for every backup, through a registration your organization owns.
- 3Set up scheduled backups. The folded list above it says what scheduled backups do not read (a few types need a person's sign-in).
- 4Open the user guide opens this guide.
1. Set it up
The setup has four steps: What this does, Sign in, The plan, Done.
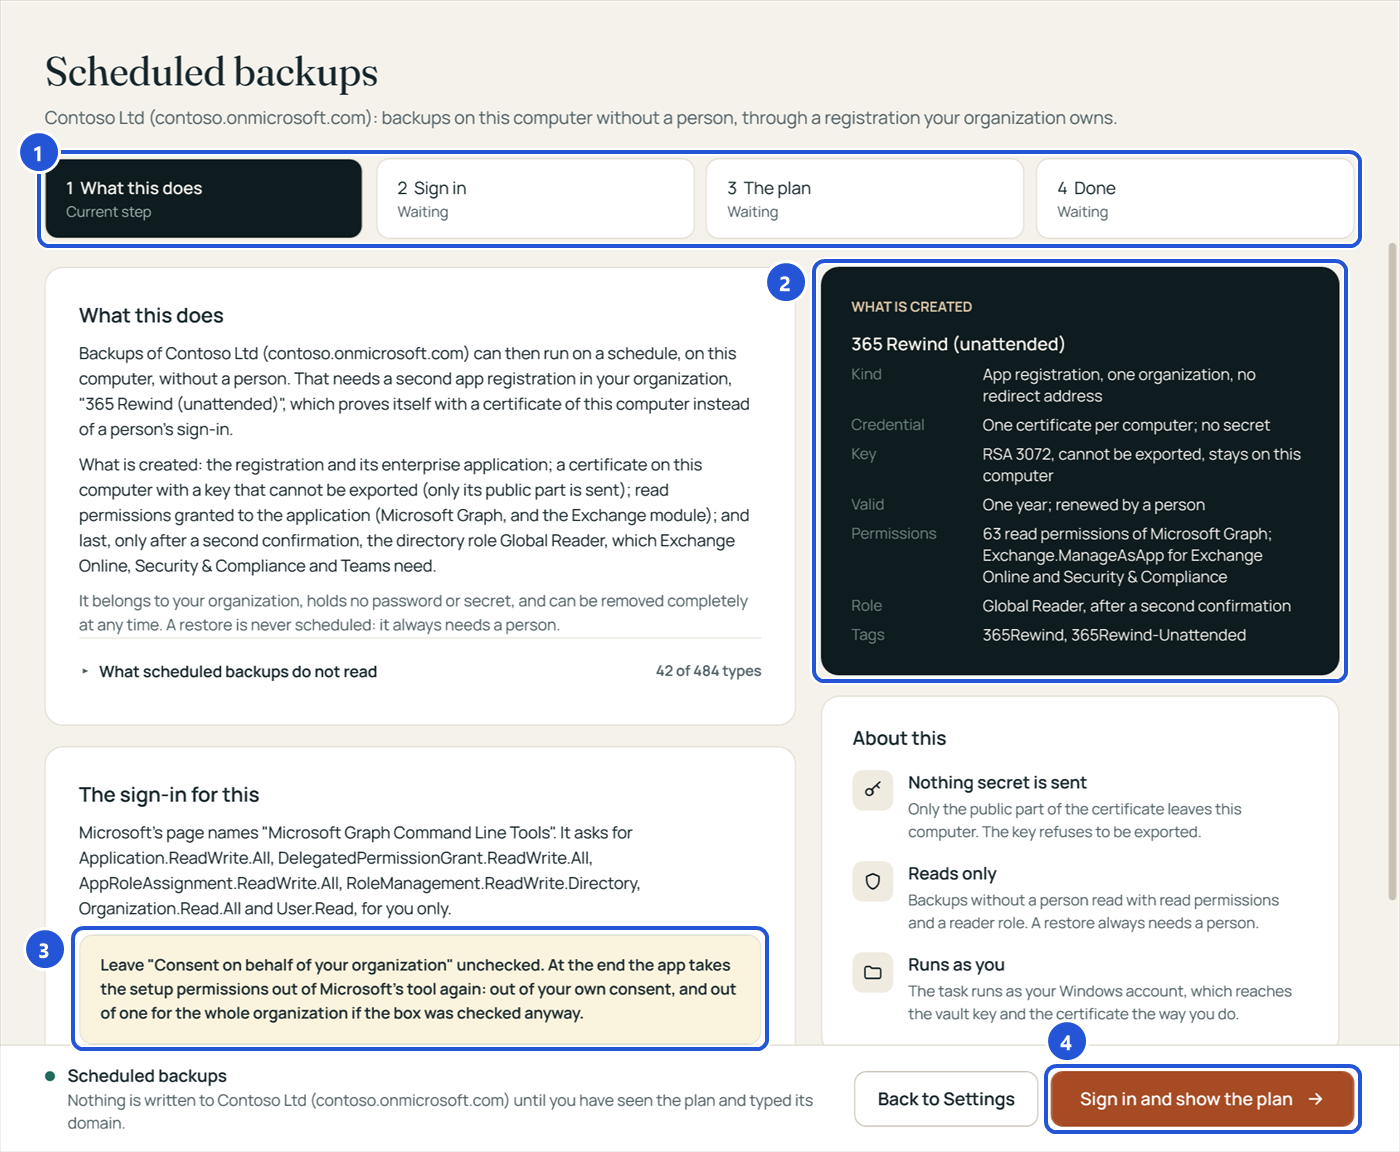
- 1The four steps of the setup.
- 2What is created: the registration, one certificate per computer (its key cannot be exported and stays on this computer), read permissions, and the Global Reader role after a second confirmation.
- 3On Microsoft's sign-in page, leave Consent on behalf of your organization unchecked. The app removes the setup permissions again at the end.
- 4Sign in and show the plan. Sign in with an account that may create app registrations and assign roles.
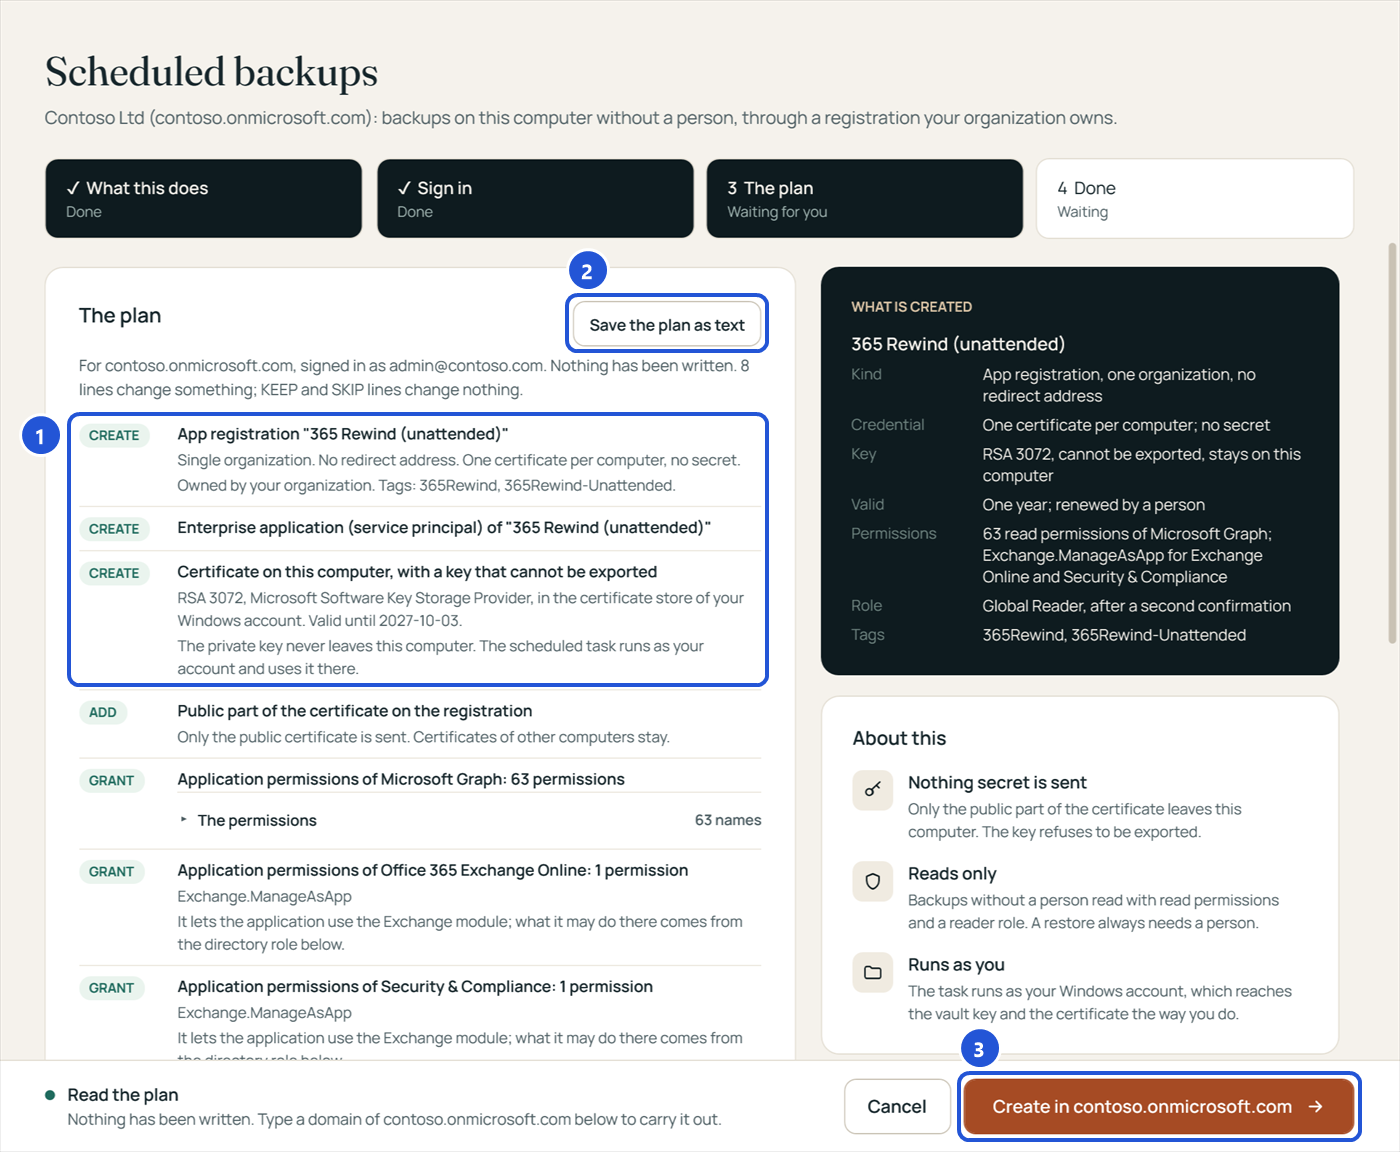
- 1Every line of the plan, marked CREATE, ADD, GRANT, KEEP or SKIP. The Global Reader role comes last.
- 2Save the plan as text, for a change request.
- 3Type a domain of the tenant below the plan; only then does Create in become available. The role asks for a second confirmation.
The step Done shows what was created and a check per service with the certificate.
2. The certificate
The certificate is valid for one year. Its private key never leaves the computer and cannot be exported; only its public part is sent to the registration. From 30 days before it ends, the app says so when it starts and in Settings; choose Renew the certificate there. A scheduled backup runs on the computer that holds the certificate, so set it up on a computer that is on at the scheduled time.
3. The schedule
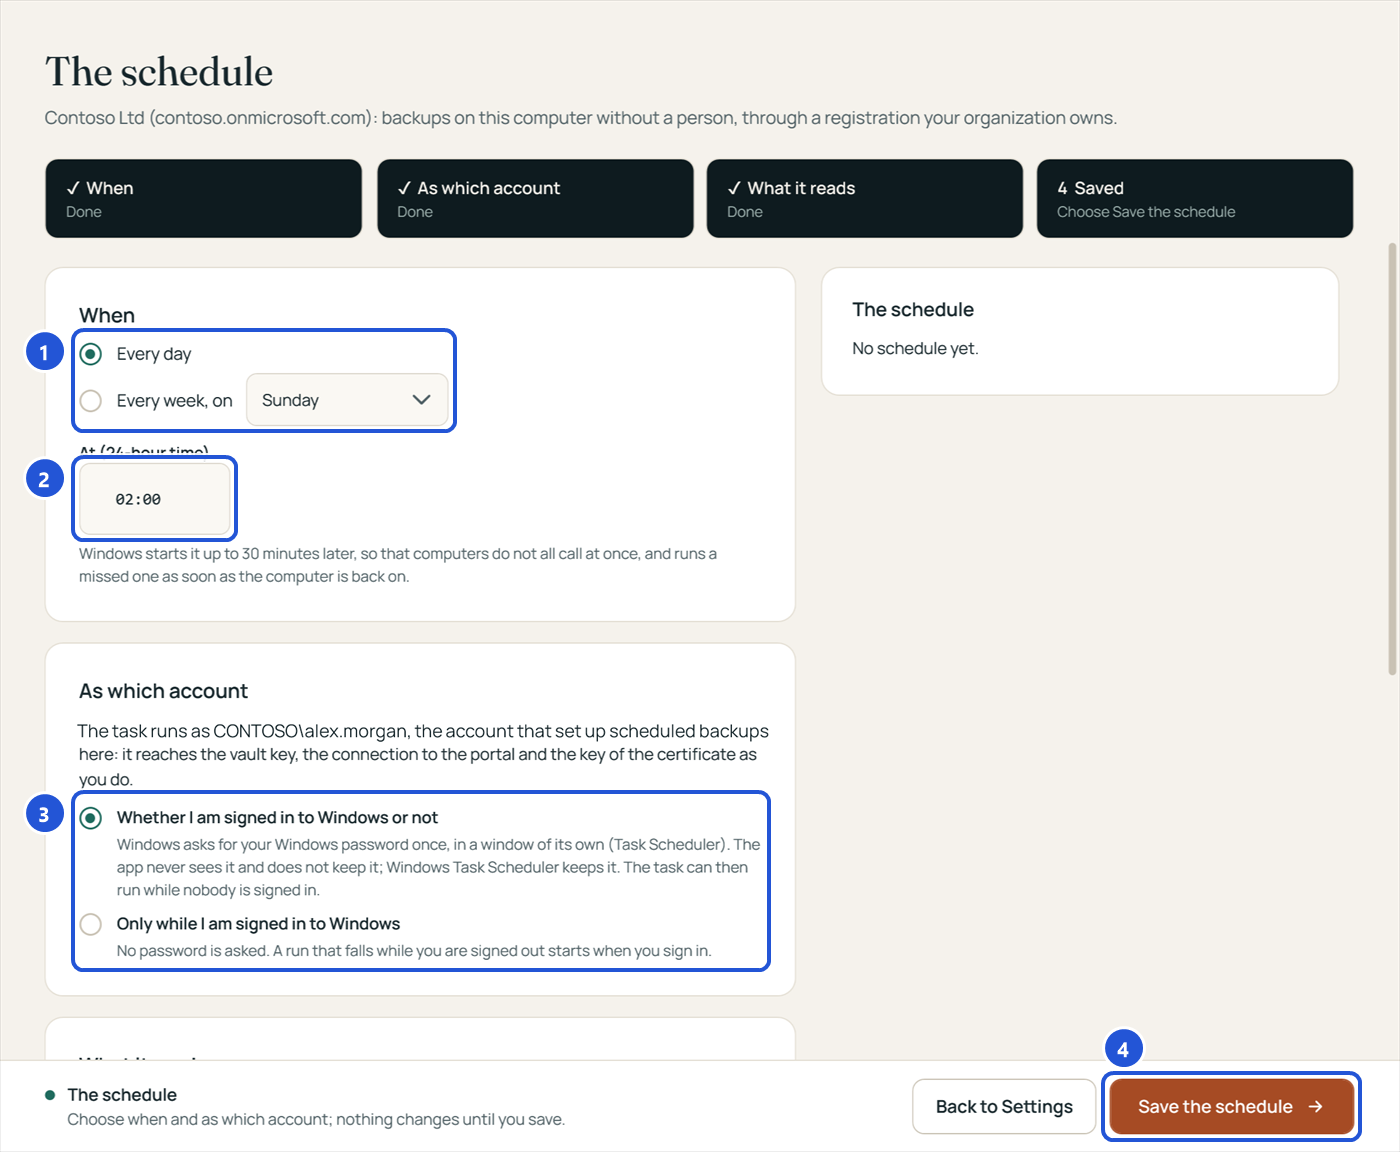
- 1Every day, or every week on a day. A weekly plan runs weekly.
- 2The time, in 24-hour time. Windows starts the task up to 30 minutes later, and runs a missed one when the computer is back on.
- 3The task runs as your Windows account. Whether I am signed in to Windows or not: Windows asks for your password once, in Task Scheduler's own window; the app never sees it. Only while I am signed in: no password.
- 4Save the schedule.
A scheduled backup reads the workloads of the last backup you ran yourself.
Where the app is kept. A scheduled backup starts ConfigBackup.exe from the folder you saved it to, without you and with the access of your tenant. Keep it in a folder only you and administrators can change: a folder of your user profile, such as Documents, or one an administrator made under Program Files. Not in a folder other Windows accounts of the computer can write, as a folder made at the top of drive C: often is. When the app runs from such a folder, it says so when you save the schedule.
4. Check on it
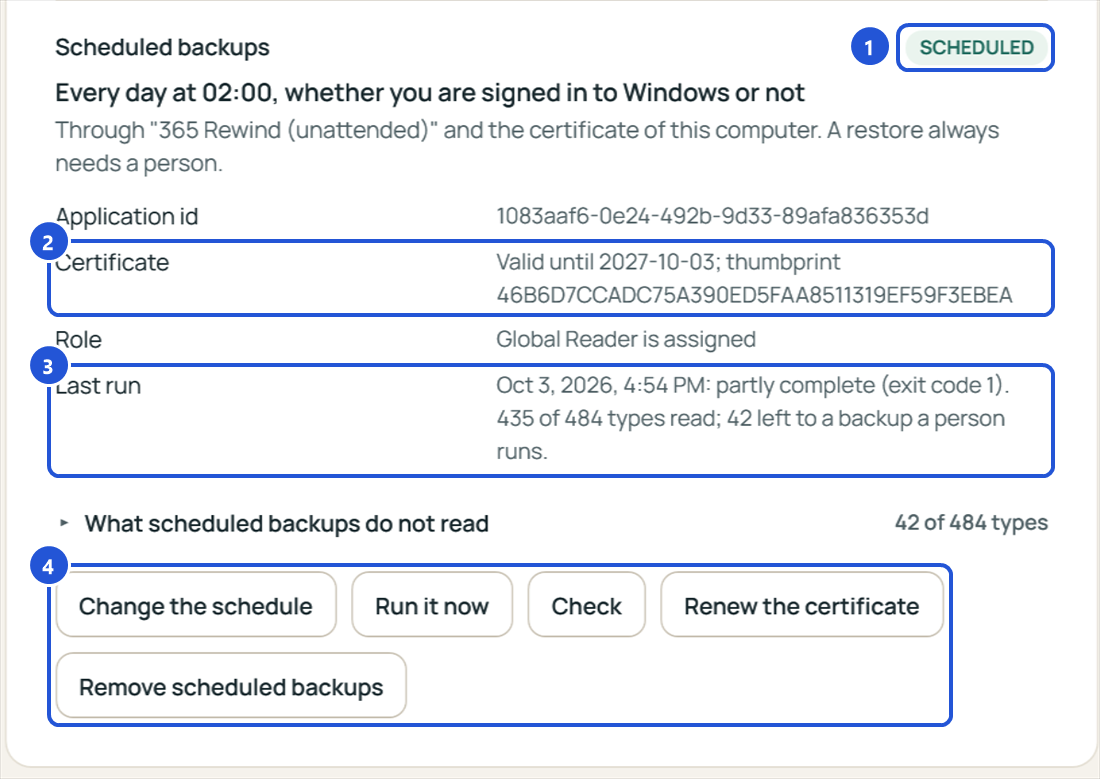
- 1The state: Not set up, No schedule or Scheduled.
- 2The certificate and until when it is valid.
- 3The last run: when, how it ended, and how many types were read.
- 4Run it now runs a scheduled backup at once and shows its result. Check tests the sign-in of every service. Remove scheduled backups shows what it found and removes it all, in order.
5. Email notifications
The portal emails the members who ask for it when a scheduled backup failed, when a scheduled backup did not report (36 hours for a daily schedule, 8 days for a weekly one: the computer may be off), and, on the Professional and MSP plans, the changes found by a scheduled backup. Each member chooses on the portal's Settings page (see Settings and notifications). Until a member chooses, owners get all three and other members none. A message names the tenant, the time and counts per workload, never a setting.
9. The portal
Sign in with your work email; the portal sends a six-digit code. The menu on the left has Tenants, Connect an app, Activity and Coverage for the workspace, and Settings and Support for your account.
Tenants
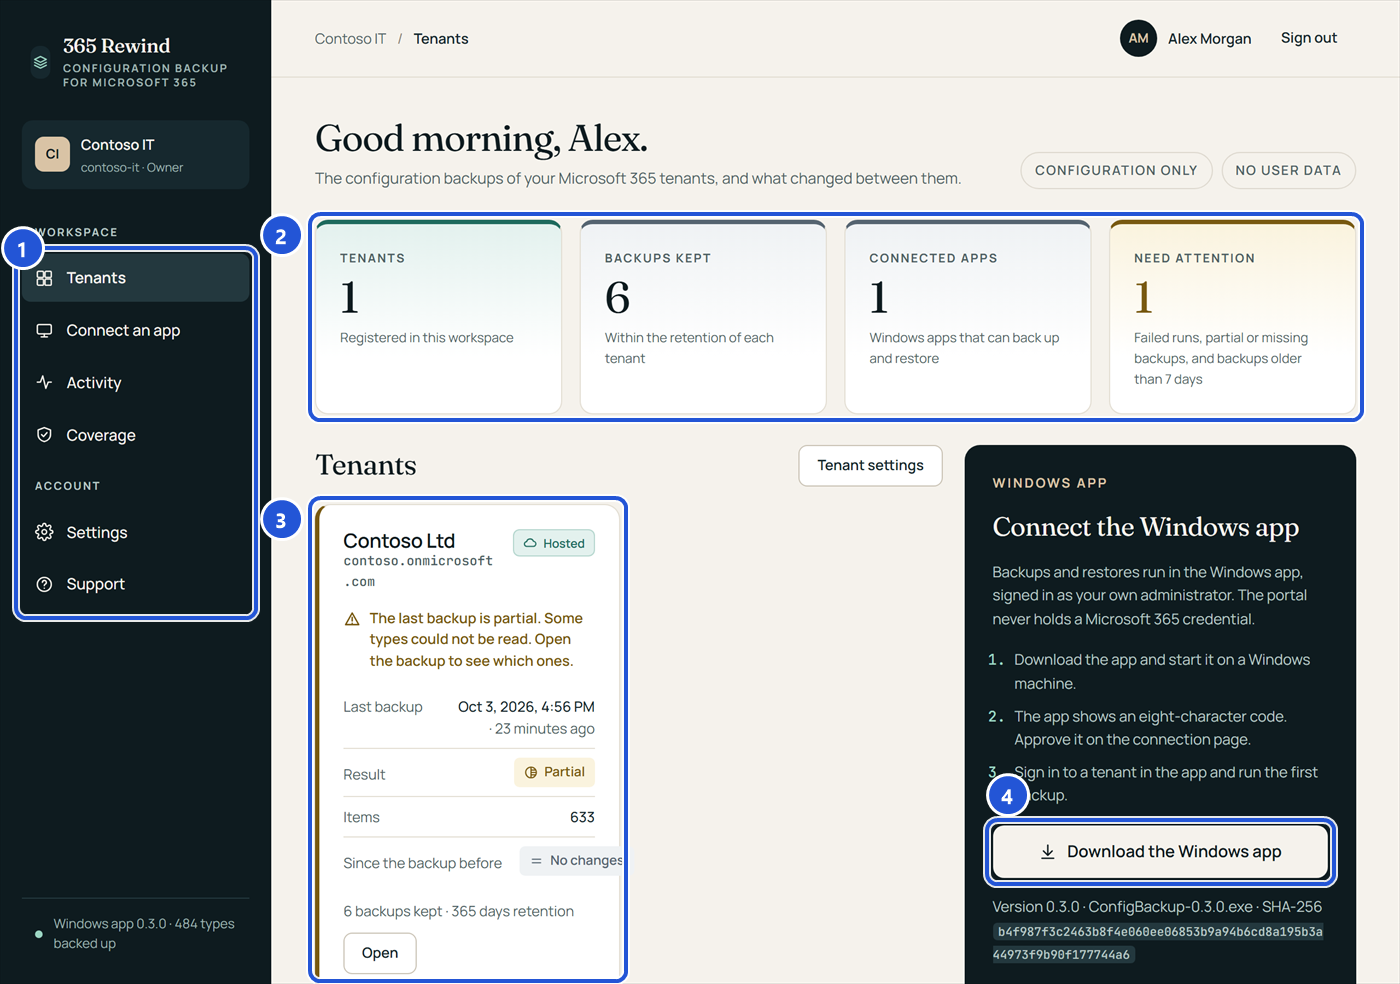
- 1The menu.
- 2The workspace at a glance. Need attention counts failed runs, partial or missing backups, and backups older than 7 days.
- 3One card per tenant: where its backups are kept, the last backup, its result and changes. Open shows the tenant.
- 4Download the Windows app, with its version and checksum.
A tenant
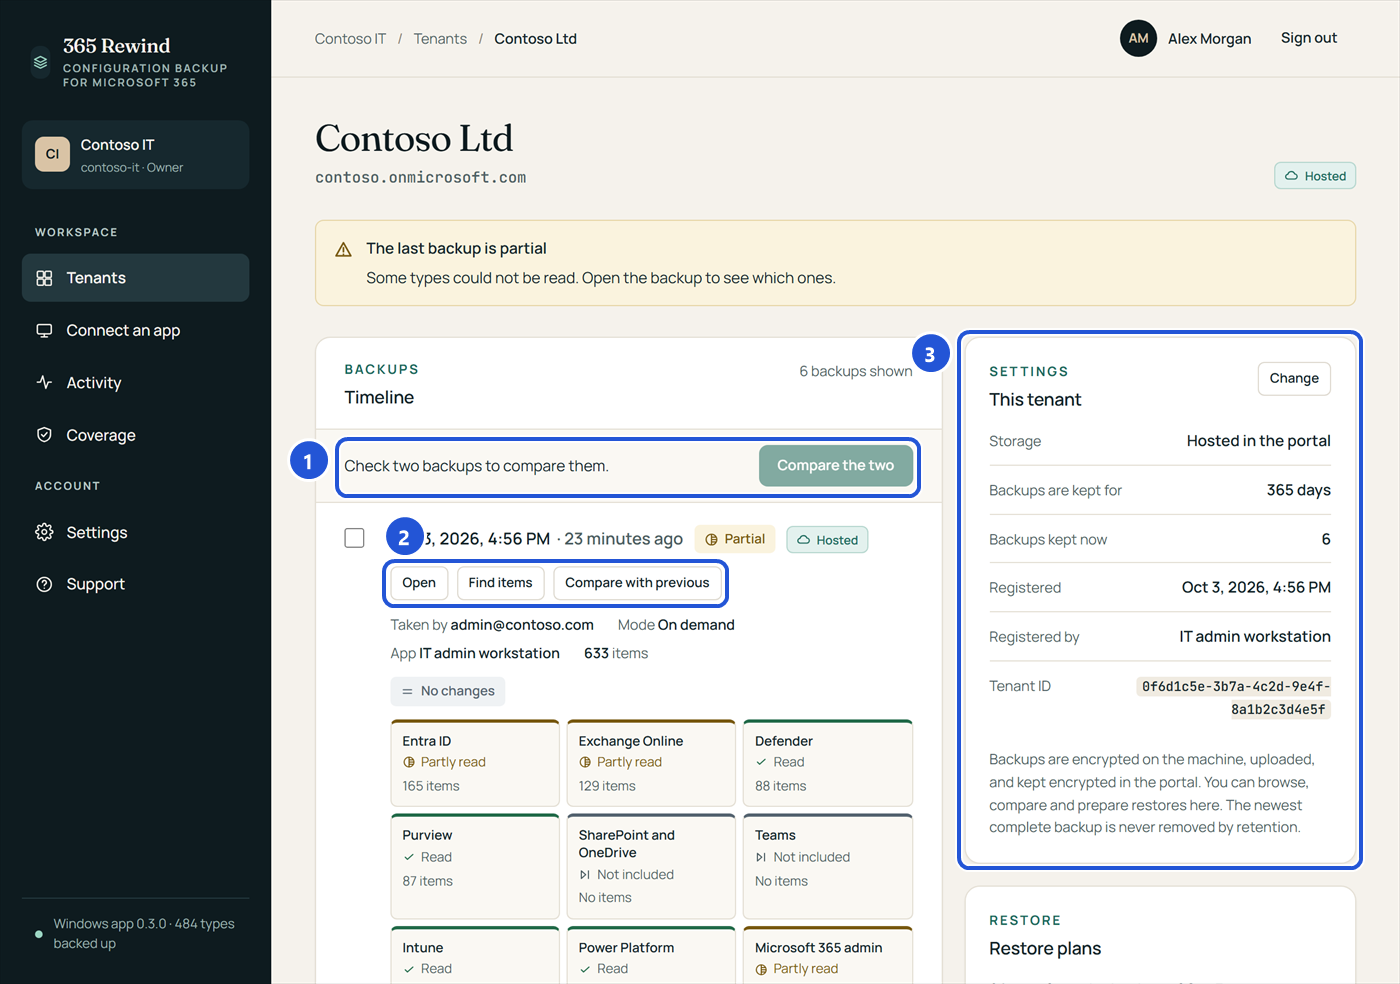
- 1Check two backups and choose Compare the two.
- 2For each backup: Open, Find items, Compare with previous. Below, what each workload read.
- 3Where backups of this tenant are kept and for how long. Change opens Settings.
Hosted backups can be browsed and compared in the portal. For a tenant kept in a local vault, the portal shows the counts and the history; its backups are browsed in the app.
A backup
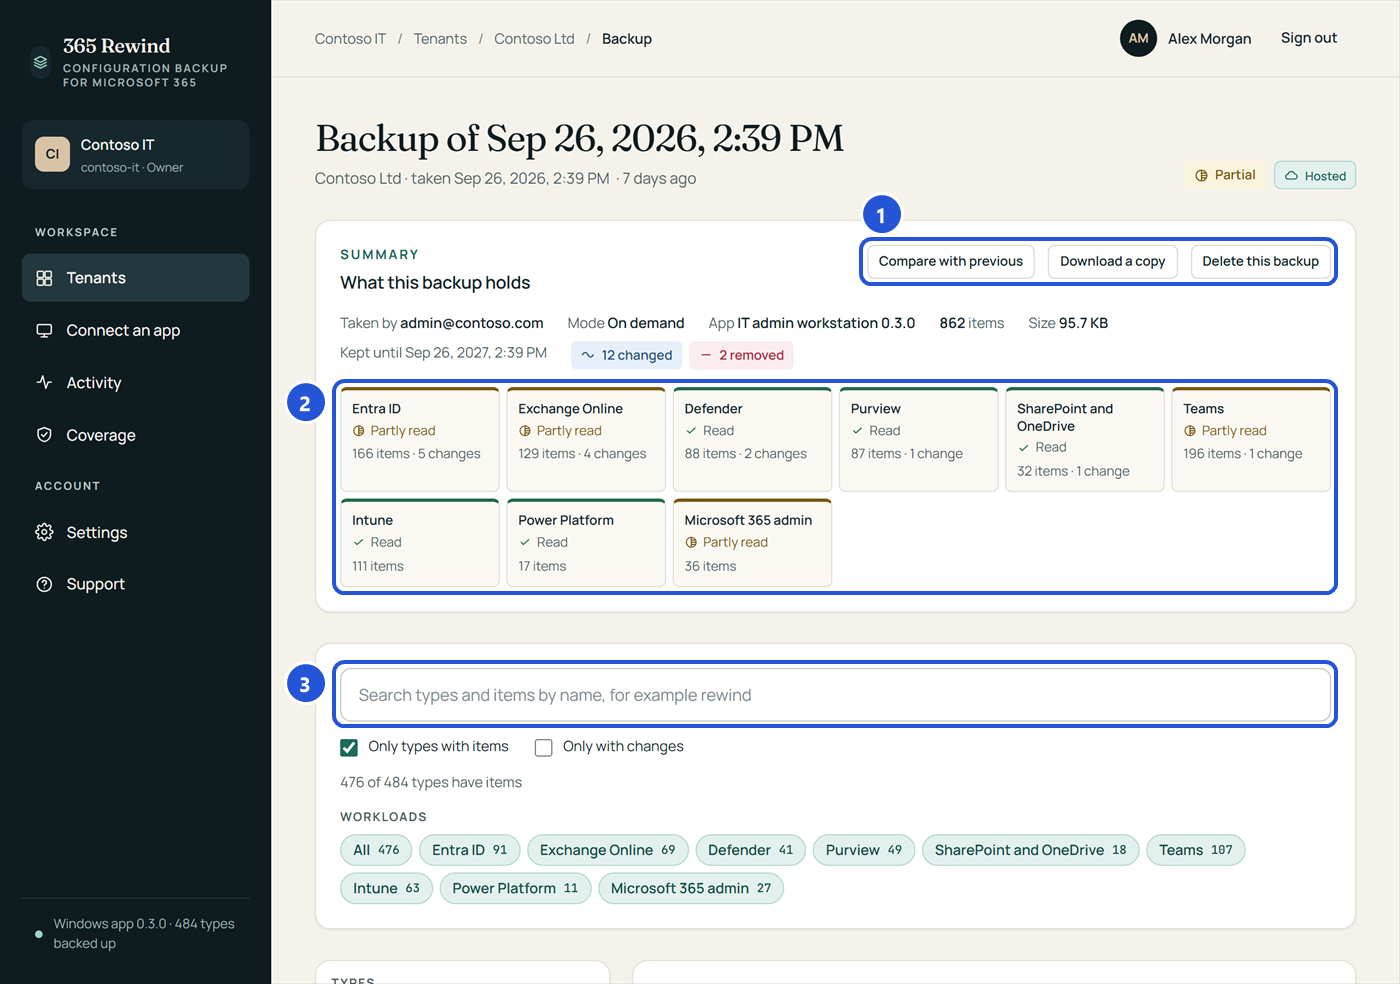
- 1Compare with previous, Download a copy (an export of the backup) and Delete this backup.
- 2What each workload holds, and whether it was read fully.
- 3Search types and items by name; open a type to see its items and their saved settings.
Compare
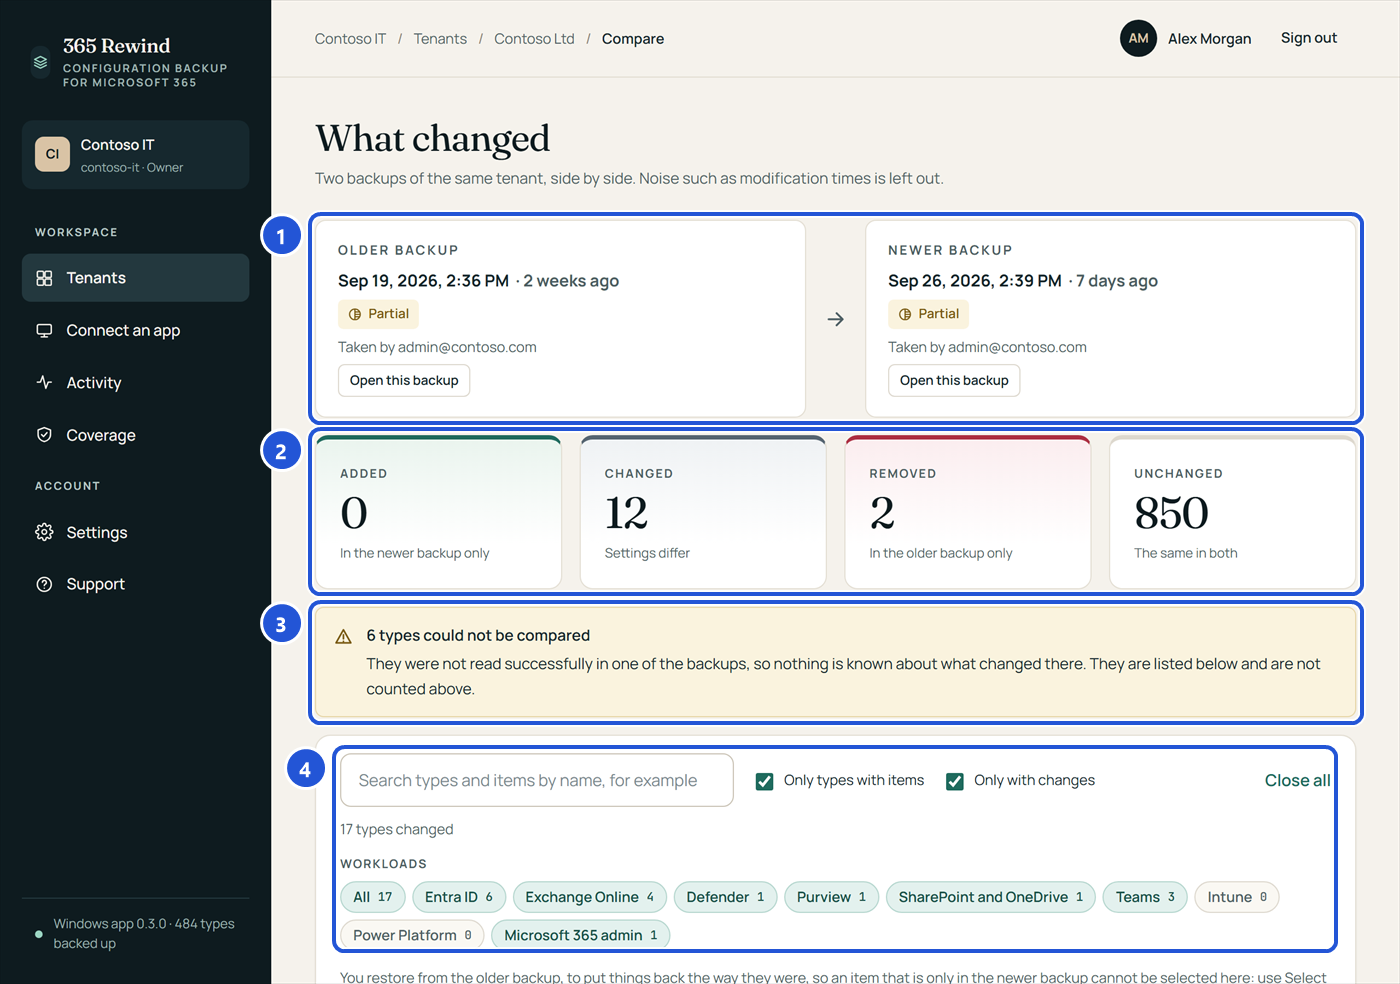
- 1The older and the newer backup.
- 2Added, changed, removed and unchanged items.
- 3Types that were not read in one of the backups. Nothing is known about what changed there, so they are not counted.
- 4Search, filters and one button per workload. Changed items show their settings side by side.
Restore plans
An owner or operator can prepare a restore in the portal from a hosted backup: check the items in the backup, choose Restore, review the plan and create it. The plan is signed by the portal and waits for the Windows app; the portal never writes to the tenant. In the app, open Restore and choose Look for plans.
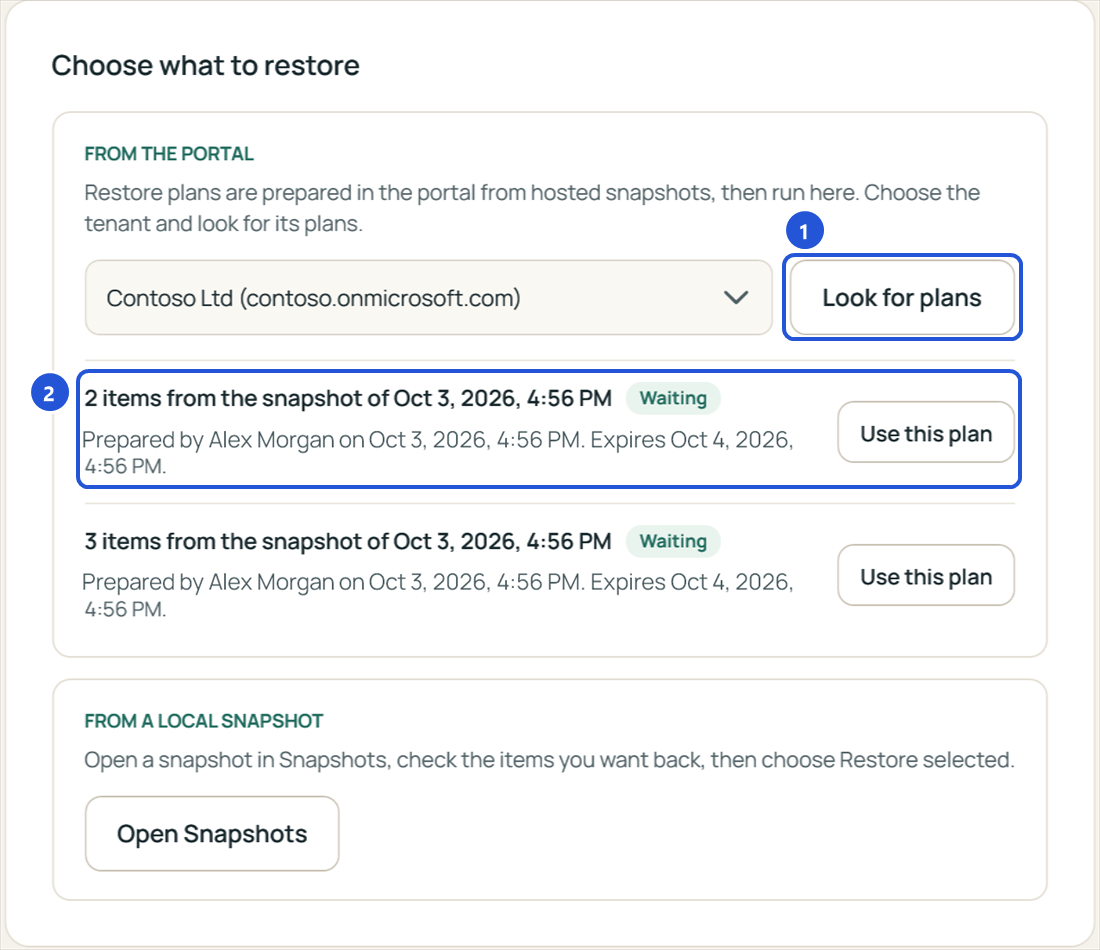
- 1Choose the tenant and Look for plans.
- 2Each waiting plan: how many items, from which backup, who prepared it and until when it can be used. Use this plan fetches it; the restore then runs as in Restoring settings.
When the restore is finished, the app reports to the portal what was applied, done by hand or still waiting, so the plan's page shows the outcome. The walk-through of a plan is also available in the portal, for whoever puts the by-hand items back.
Members
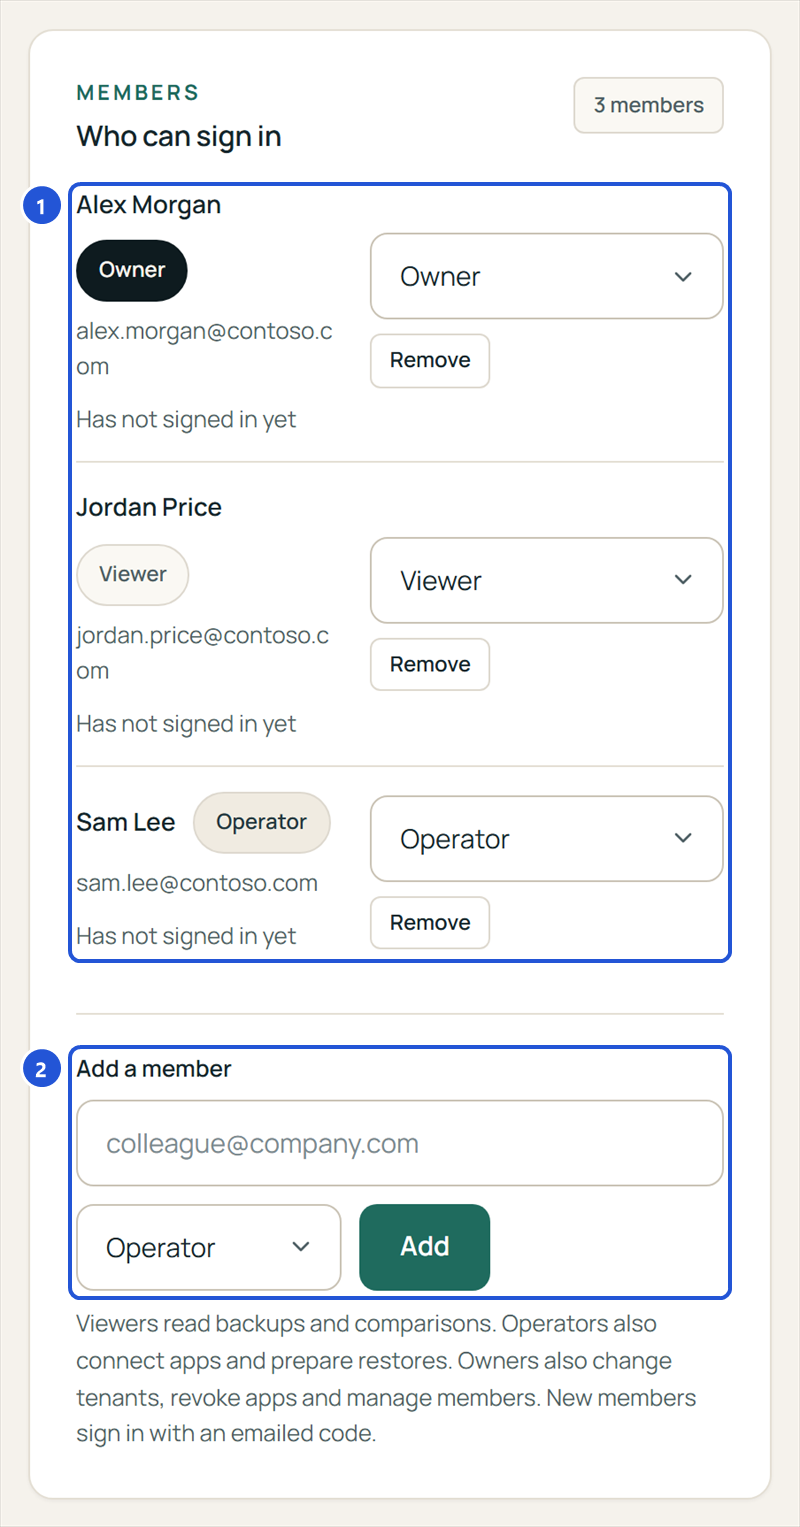
- 1Who can sign in, with their role. Change a role or Remove a member.
- 2Add a member with their work email and a role. They sign in with an emailed code.
Viewers read backups and comparisons. Operators also connect apps and prepare restores. Owners also change tenants, revoke apps, manage members and choose plans. A workspace always keeps at least one owner.
Settings and notifications
The portal's Settings page also holds, per tenant, its display name, how long backups are kept and where they are kept (a change applies to future backups); the connected apps, each with its machine, version and last contact, and Revoke; and whether connected apps may open backups kept in the portal.
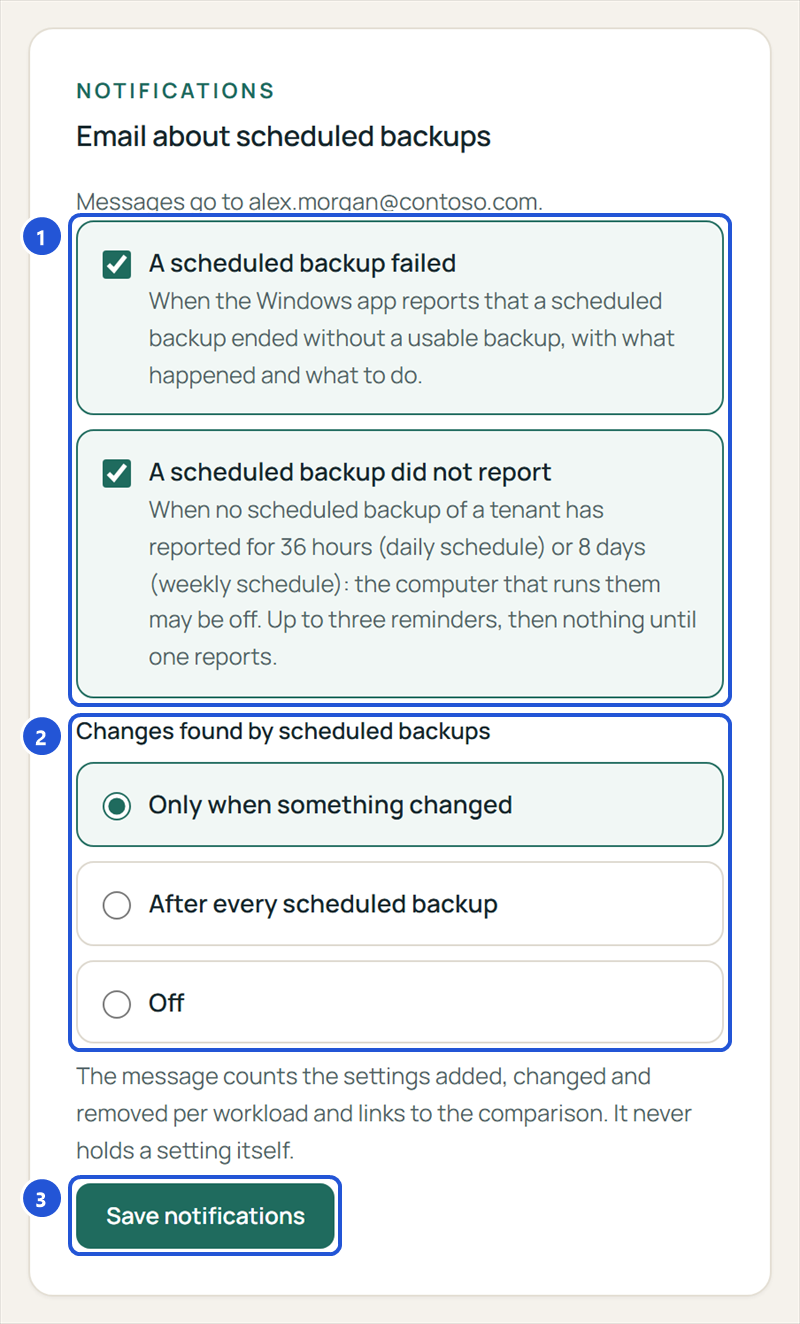
- 1Email when a scheduled backup failed or did not report.
- 2Email about the changes found by scheduled backups: only when something changed, after every scheduled backup, or off. The message counts the settings added, changed and removed per workload and links to the comparison.
- 3Save notifications.
Activity lists what happened in the workspace: backups received, apps connected, plans created and run, members changed, notifications sent. Coverage lists every setting type the app backs up and how each is restored.
10. Plans
Every workspace starts as a free Preview for one tenant. The Preview backs up a sample of 10 setting types, up to 3 times, so you can browse your own settings and compare one backup with the next. History is kept 30 days. Restore is locked in the Preview; the app and the portal say so where it applies, and the counts read "10 of 484 types in this preview".
The plans add every setting type, backups without a limit, scheduled backups, longer history and restore:
- One-time snapshot: two full backups and automatic restore for 30 days, then the tenant returns to the Preview.
- Essentials: one tenant, weekly scheduled backups, 90 days of history, restore by hand with walk-throughs and restore scripts.
- Professional: daily scheduled backups, one year of history, automatic restore with preview and rollback, change alerts by email.
- MSP: everything in Professional, for every tenant, in one workspace.
To subscribe, an owner opens the portal's Settings page: each tenant shows its plan, and Purchase a plan lists the plans: pay online by card or bank debit, or choose Request an invoice. The tenant is unlocked as soon as the payment or the invoice is paid; the app picks up the new plan the next time it connects. Prices and the full comparison are on the Pricing page.
A plan runs until its end date and does not renew by itself; renewing is a new invoice. When a plan ends, no new backups are taken and restores are no longer prepared or applied automatically. Hosted backups are kept for 90 days after the end: you can still sign in, browse, compare and download them, the tenant's page shows the date they are deleted, and the owners are emailed 30 and 7 days before. A plan that runs again stops the deletion. Backups in a local vault stay readable on your computer: the app still opens and compares them and walks you through restoring them by hand.
11. Technical Support and Feature request
Two forms reach a person, who answers by email: Technical Support when something does not work as expected, and Feature request for something you would like the product to do. Every member can use them, on every plan, including the Preview.
From the portal
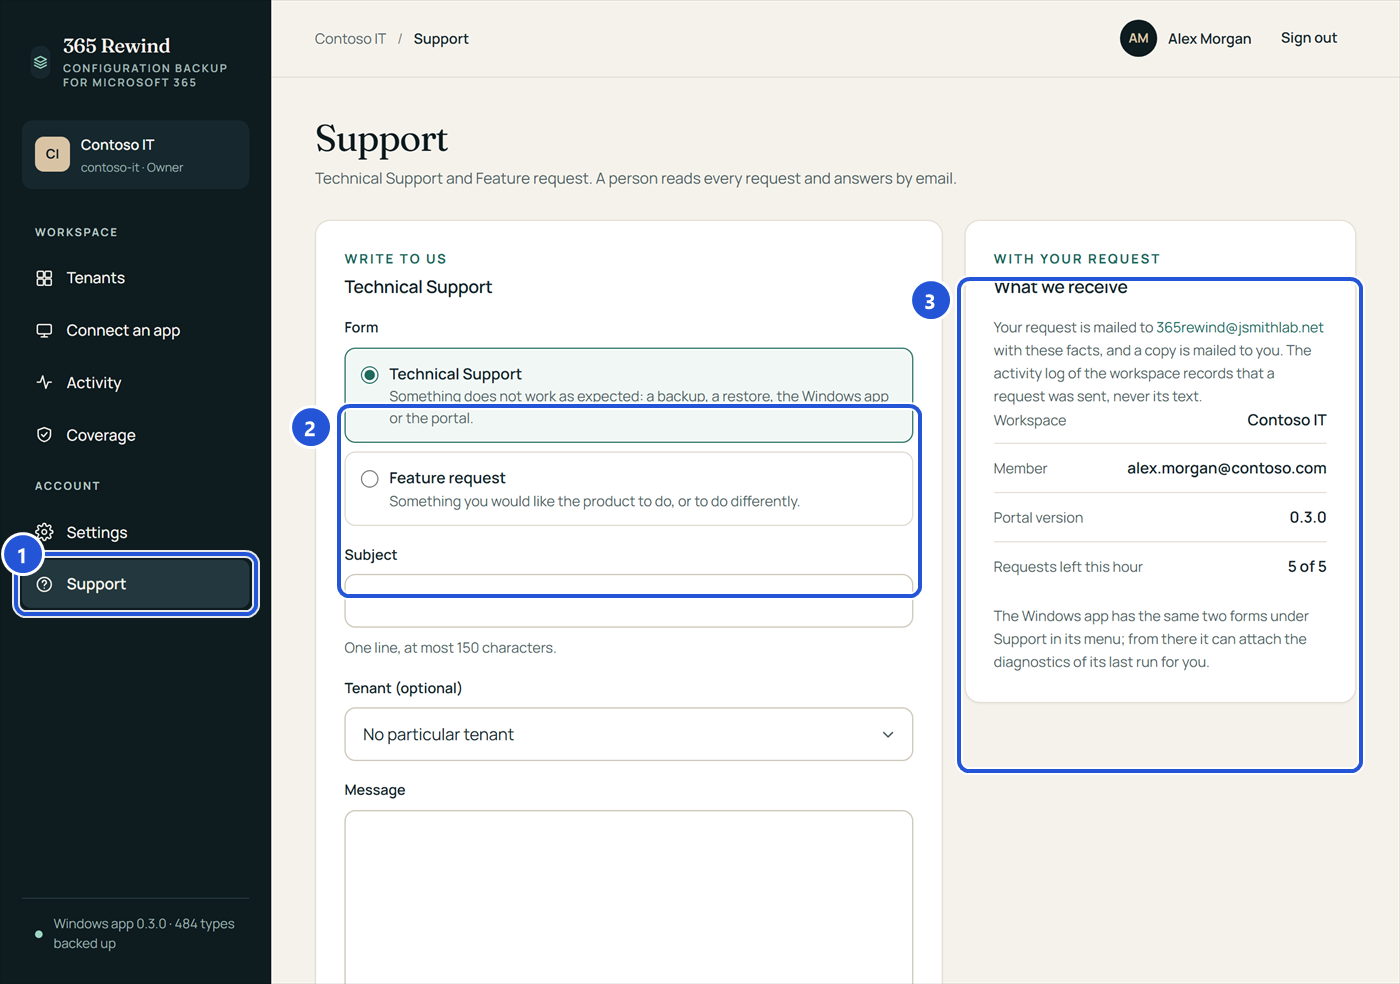
- 1Support in the Account part of the menu.
- 2Choose the form, then write a subject (one line) and the message: what happened, what you expected, and when. You may name the tenant. Please do not paste passwords, keys or settings of your tenant.
- 3What is sent with the request: the workspace, you, and the portal version. A copy is mailed to you; the activity log records that a request was sent, never its text.
For Technical Support you can attach the diagnostics of the Windows app (below). The page shows exactly what is sent before you send it. After Send the page shows a reference such as TS-20261003-7KQ2MX; mention it when you write about the same problem. Each member can send 5 requests an hour.
From the Windows app
Choose Support in the app's menu. The same two forms open in a window of their own. A connected app sends the request through the portal, with the tenant you are signed in to, the app version and the time, and can attach the diagnostics of its last run with one check box; the window shows the attachment in full before you send it. An app that is not connected offers Open the contact page instead.
Diagnostics
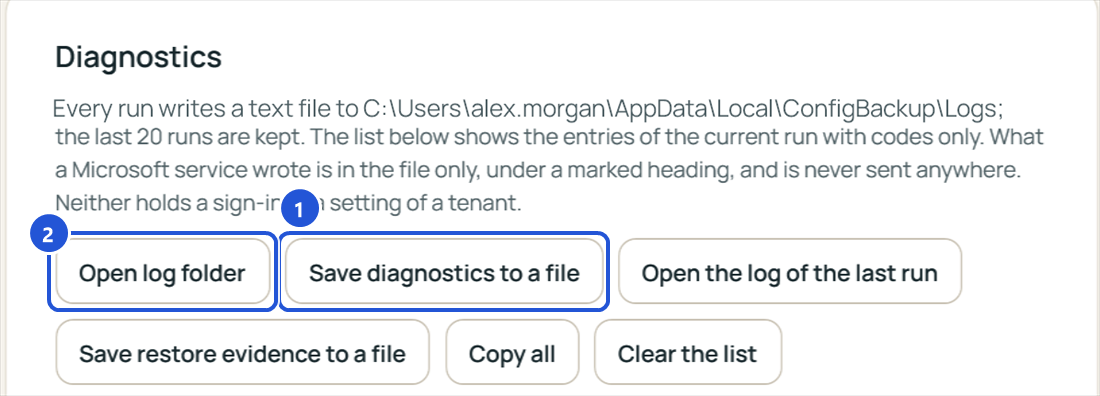
- 1Save diagnostics to a file writes a text file to attach in the portal's Support page.
- 2Open log folder: every run writes a text file there; the last 20 runs are kept.
Diagnostics hold no sign-in and no settings of a tenant. The part marked LOCAL ONLY may hold names from your tenant; it is left out of whatever is sent, but read the file before you attach it elsewhere.
Not a customer yet? The Contact page has the sales address.